


2x4 L Shaped Work Bench Cut List / 3D Printed Accessories
Model originally uploaded to Thingiverse at https://www.thingiverse.com/thing:4416097.
Updates:- 6/2/20 - Added instructions and 3d dimensioned images to assist in building this work bench yourself. Any questions don't hesitate to ask and I'll do my best to assist!
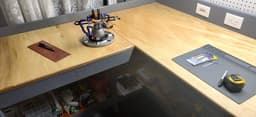
This is a 2x4 L-Shaped work bench that I designed based around some basic cheap work bench designs I saw online. The materials for this build cost around $100 USD for the 2x4's using the premium full-sized 96" 2x4's from home depot for the work bench top I used a single 4'x8'x3/4" sanded plywood which cost around $40 USD, for the shelves I used 4'x8'x3/4" sanded plywood which cost around $20 USD. To paint the 2x4's I used Rustoleum Gloss Smoke Gray, to finish the work bench top and shelves I used 3 coats of Varathane Ultimate Oil-Based Polyurethane (sanded with 150 grit before applying urethane and sanding with 350-400 grit between coats).
Included is an optimized cut list in PDF form created from kurraglenindustries's great free custlist optimizer website.
ToolsI'm an elevator constructor/electrician by trade, no expert woodworker but with this project I borrowed a friend's chopsaw and table saw, used my Makita RT0701C 1 1/4HP router that I got for my RS-CNC32 project to smooth out the edges of the 1x6" backsplash I used to mount outlets and a brush plate for cleanly running wires from underneath to the work surface for my laptop power brick and whatnot.
Instructions-
More detailed instructions are coming soon, this initial post is mostly to share the 3d printed files such as the Pegboard spacer, wire management, work surface tramming mounts, etc.
-
The Board Tram Mount file is for mounting the work surface from underneath without having screws show from the top. This also was advantageous seeing as the top framing of my workbench became twisted and wasn't completely flat. Using 3/4" screws I screwed it from the bottom, trammed the bench top using shims and screwed it into the 2x4. This is much faster and easier than making pocket holes.
-
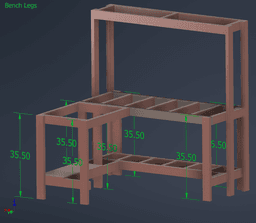
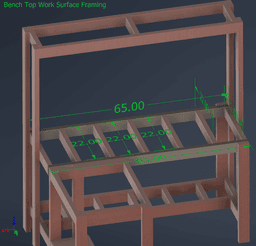
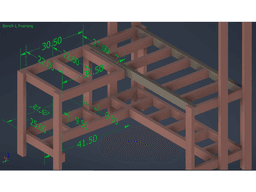
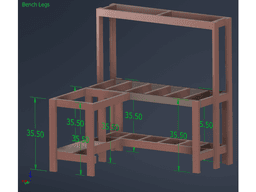
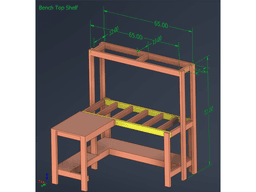
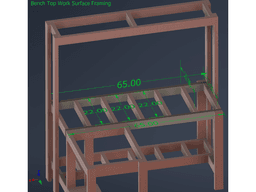
Dimensioned Images:
- 2 1/2" construction screws (I prefer the T25 torx head ones, lets face it philips sucks if you ever want to take this monstrosity apart)
- 1 1/4" construction screws torx head
- 3/4" wood screws
After you've finished cutting the 2x4's as listed in the cut list, it's recommended to predrill the holes and drill countersink (if you have the tool to do so) and build the frames in this order:
- Build Work Surface Framing
- Build Bottom Shelf Framing
- Screw 4 Legs to Top Work Surface (upside down)
- Flip over and using 4x 6" cut scraps of 2x4's sit the bottom shelf on top of the 6" scraps underneath the top work surface to more easily drill and screw in the bottom shelf
- Build Top Shelf Framing
- Screw 4 Top Shelf 72" Legs to top shelf framing (upside down)
- Flip the top shelf frame with legs attached on top of currently built bench, drill and screw in
- Build Top Work Surface for L shape Part and attach legs
- Attach the L shaped top work surface to currently built bench (may need to use scrap 2x4's screwed into bench top frame in order to have something to screw into)
- Finish construction of bottom shelf on L part using above diagrams for reference
- Measure for shelves and all work surfaces you want covered in plywood or preferred work surface. I used 1/4" sanded plywood for shelves and 3/4" sanded plywood for work surfaces sanded with 150 grit, finished with polyurethane sanding with 350-400 grit between coats
2x4 L Shaped Work Bench Cut List / 3D Printed Accessories
![CHOIS Half InnerTray [Expansion Part] 3d model](/_next/image?url=https%3A%2F%2Fstorage.googleapis.com%2Fproduction-thangs-public%2Fuploads%2Fenhanced_images%2Fv1%2F4245a644-3936-473b-87fe-134d912e3ddd%2FQuarterInnerTray2.png&w=3840&q=75)
CHOIS Half InnerTray [Expansion Part]
![CHOIS Quarter Inner Tray [Expansion Part] 3d model](/_next/image?url=https%3A%2F%2Fstorage.googleapis.com%2Fproduction-thangs-public%2Fuploads%2Fenhanced_images%2Fv1%2Fe2eb18e3-7fcd-4877-8e02-df55a6777a3e%2FQuarterInnerTray1.png&w=3840&q=75)
CHOIS Quarter Inner Tray [Expansion Part]
Fig Series Collection

Miniature Replica 1:12 SANAA 07. Flower Bench for Miniature Dollhouse - 3D Print Instant Download -

Miniature Replica 04. STOCKHOLM 2025 Shelving bench for Miniature Dollhouse - IKEA - 3D Print Instan
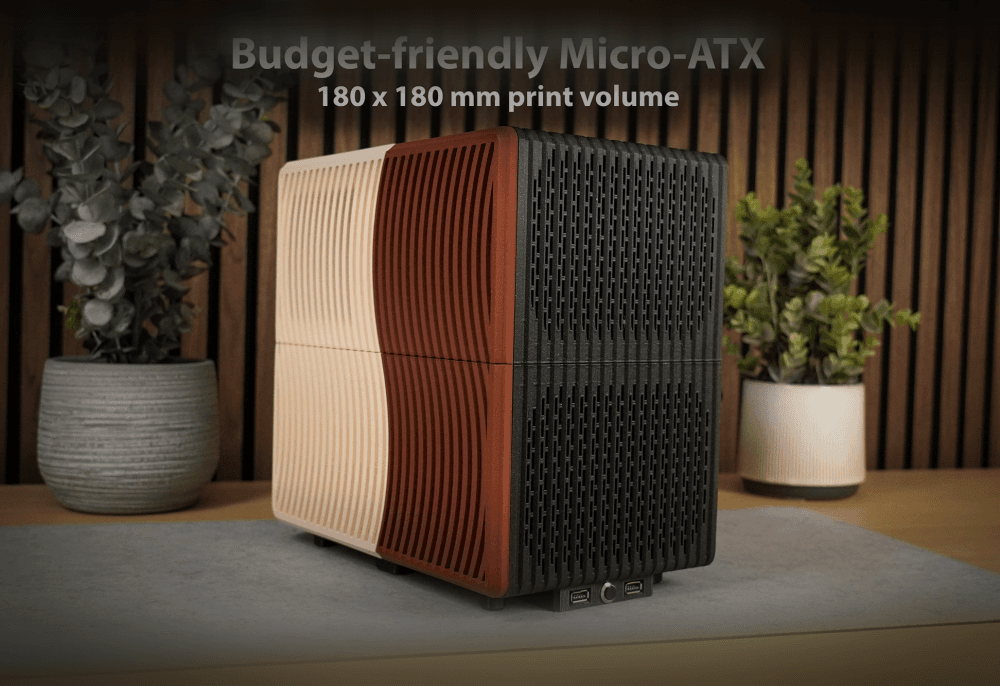
Budget-friendly mATX case

Large Glinda Wand

The Tip Jar!
_x2.png&w=3840&q=75)
ORTHOPUS Supporter customizable 3D skins

Miniature Replica 13. KALLAX TV Bench with Underframe for Miniature Dollhouse IKEA 3D for Miniature

Nashville, TN - S, M, & L

Miniature Replica 02. BROR Work Bench for Miniature Dollhouse - IKEA - 3D Print Instant Download

Melbourne, Australia - S, M, & L

Miniature Replica 09. EKEDALEN Table and 2 Benches for Miniature Dollhouse IKEA 3D Print (1:12,24,48

The Legend of Zelda Loot Chest (Container/Box) v2.0

Miami, FL - S, M, & L

GEN2 115 Tabletop Starter Kit
Assorted Tool Tray, Gridfinity 2x4 base
