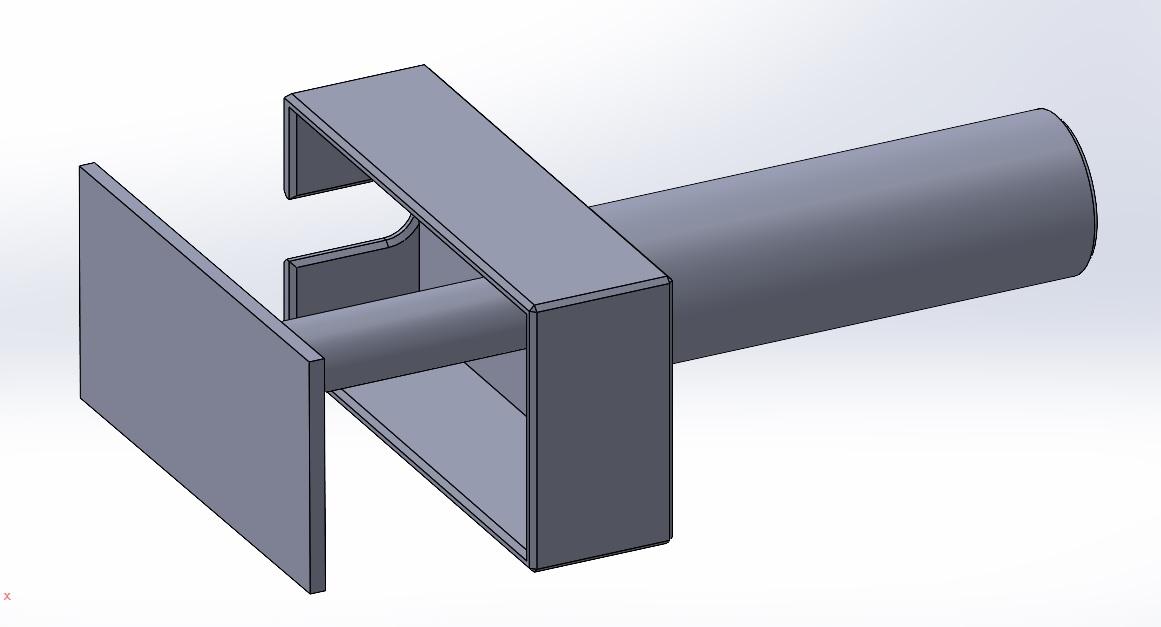
This design is for an upgraded Ice-cream Sandwich maker, with slider, the slider is used to push the constructed ice-cream wafer out once completed. The design for the wafer holder also has a cut away to access the ice-cream sandwich if the plunger is not used, the slider is therefore optional (omit files 3 and 4 in the build). I used Solidworks to design the Ice-Cream Sandwich maker, the stl files are attached, the sldprt and sldasm files are available, please contact me. This design consists of four files:
- IceCreamWaferHolder.stl
- IceCreamWaferHolderHandle.stl
- IceCreamSlider.stl
- IceCreamSliderHandle.stl I used the Cura slicer to create the gcode file for my Artillery Sidewinder 1 printer and was able to build all components at the same time. A brim is used to stabilise the handles since they are quite tall, the Wafer Holder and Slider should be positioned horizontally on the build plate, the Wafer Holder and the Slider Holder should be positioned vertically on the build plate. Major Cura Parameters for the Eryone Multicolour pla+ I used: Infill: 15% Infill pattern: Gyroid Adhesion Support: Brim Initial Layer Bed Temperature: 80C Initial Layer Extruder Temperature: 220C Subsequent Layers Bed Temperature: 60C Subsequent Layers Extruder Temperature: 200C
Once printed: the IceCreamWaferHolderHandle (file 2), should be glued to the IceCreamWaferHolder (file 1), use the IceCreamSliderHandle (file 4) to align the hole in the handle (2) with the hole in the wafer holder (1), take care not to glue the slider handle to the wafer holder during the process. The IceCreamSliderHandle (file 4) should be glued to the Ice-Cream Slider (file 3), there is a small reduced circumference in one end of the Slider Handle to fit into the bottom of the slider, this is to facilitate alignment. I used a polychloride glue, smelly but very effective. Some sanding of the Slider Holder and the Slider itself may be necessary dependent upon the accuracy of your printer. The Slider Handle should smoothly slide in the hole in the Wafer Holder and the Wafer Holder Handle. The Slider should fit snuggly into the Wafer Holder. Once together a short length of Slider Handle should emerge through the bottom of the Wafer Holder Handle, when the bottom of the Slider handle is pushed the slider should move freely up through the Wafer Holder. Use: Place the Slider Holder into the hole in the Wafer Holder so that the Slider fits inside the Wafer Holder. Place a single standard ice-cream wafer (I used Askeys 48 wafers) into the Wafer Holder, spoon sufficient ice-cream and topping of your choice (I use Lotus Biscoff or Nutella ) onto the top of the wafer inside the Wafer Holder, when you have enough ice-cream/topping place another wafer on the ice-cream. The ice-cream sandwich may now be pushed out of the Wafer Holder using the Slide Handle. I found it helpful to stand the Ice-Cream Sandwich Maker upright in a tall glass during the ice-cream sandwich construction process. Happy munching!


