


DIY Seedling Grow Light
Background In previous years I had tried to start seeds inside. Due to lack of light they always grew too leggy and ended up not working out. This year I wanted to try adding some grow lights to help. Some people use shop lights but where is the fun and 3D printing in that :)
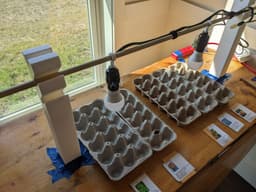
This setup is partly 3D printed with the rest found at local hardware stores or stuff I already had around.
Shopping/Scavenge List 1 - 1/2" dowel rod long enough for all your lights 1 - Outlet timer 1 - Power strip
For each light you want to add: 1 - grow light (I bought an extremely cheap one, there are probably better out there) 1 - lamp socket with indoor extension cord (16 awg or smaller) or replacement lamp socket with cord
Print List Two stands which consist of a top and bottom and a threaded lamp hook for each light you are using
0.2 layer height was used for all prints
The top was printed on its side with supports only over the connector at the end at 15% infill
Top bottom was printed standing up with 15% infill and no supports
The threaded lamp hook can be printed standing up with 50% infill. I used a raft for better adhesion, otherwise it would fall over mid-print.
Assembly
- Print two tops and two bottom stands
- Push the top and bottom together with some force
- Print a threaded lamp hook for each light
- Attach the threaded lamp hook to the lamp socket
- Disassemble the lamp socket
- If you are using an extension cord, cut the female end off
- Thread the cord through the hook and lamp socket
- Split the wires and using wire strippers, scissors, or knife carefully strip about 1/2" to 3/4" off the end of each.
- If your wire is small enough (mine wasn't) tie an Underwriter’s Knot with the wires
- Make hooks with exposed wire and attach to the lamp socket
- Reassemble the lamp socket and install a bulb
- Plug the lamp in and test to make sure that it is working
- Slide each lamp onto the dowel rod and lay on the stand
- If your stand is a too wobbly, add some painter's tape to each
Remixable Each part was designed in Fusion 360. I have included the f3d files so feel free to remix in any way!
DIY Seedling Grow Light
Grow Light Planter

Check Engine Light DIY LED Box

The Rail - Grow Light Attachment
Grow Light Bracket 2.0 v7.stl

IKEA Växer LED grow light holder

Lantern, desk vase with grow light and drip tray.

Ozito LED 120x36mm - DIY LED Light
DIY Traffic Light

Light No Fire: DIY Desk Lamp
Ozito LED 94x50mm - DIY LED Light

Candle Stamp Tile Set, 5 Sizes, Perfect for Clay, Cookies & Fondant, 20-40mm Motifs, Cozy Light Design, DIY Decoration PRODUCT_3791
Modular Wall Light
DIY DeLorean Time Machine with Lights!!

Logical Grow Platform (LGP) – Modular Adjustable Indoor Growing System

Lamp DIY
Standard Lamp : Print and Grow

Deep Cell Plug Tray – 2×3 Modular Seed Starter System

Deep Cell Plug Tray – 5×3 Modular Seed Starter System

Deep Cell Plug Tray – 2×5 Modular Seed Starter System