Featherboard for woodworking, no supports needed, with M5 & M6 options for knobs & track slides
byDesign8Studio.com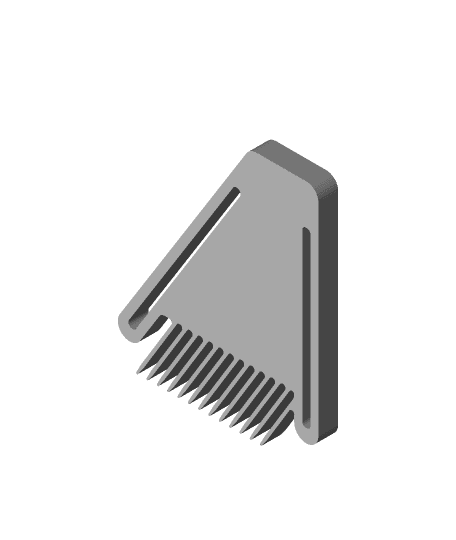
Model originally uploaded to Thingiverse at https://www.thingiverse.com/thing:5356329.
Featherboard for woodworking, no supports needed, with M5 & M6 options for knobs & track slidesNotes:
-
Heads up on varying miter track / t-track dimensions: Not all table saws and/or router tables have the same specs. I designed the included track slides to fit the miter tracks of my new SKIL 10 Inch Heavy Duty Worm Drive Table Saw with Stand - SPT99-11. (Wow, what a nice upgrade from my previous cheap table saw.) Whenever I finally get a router table built, it will have t-tracks (ordered and in-hand) that are more standardized. I'll then need to remix a new set of slides for that. Once I do, I will add the new ones here. In the meantime, if you remix this "thing" to suit your own needs, please consider posting the remix as a derivative of this, so others whose needs match yours, can benefit from your remix work.
-
Choice of bolt diameter: I've included slides and knobs for both M5 and M6 bolts/nuts. I chose to use M5.
-
Bolt length: I used 40mm length bolts. Here's a link to the 4-pack from Lowes that I used, but take note that unlike their site image, which shows only partial threads, the actual bolts were full thread.
-
"Bolt down" (in knob) v. "bolt up" (in slide), I recommend bolt up — inserting the bolts into the slides, and inserting the nuts in the knobs. That not only allows you leeway on exactly how long your bolt has to be, but also eliminates the chance of a bolt sticking out too far below, and scratching your miter track / slide groove.
-
Slides: sacrifice layer for successful prints The track slides are designed with a 1-layer-thick sacrifice layer covering where the bolt hole transitions from hex-head area to round-shaft area. You can burn that thin layer out with a soldering iron, or cut it out with an Xacto knife. Even a drill bit could be used to drill it open.
-
Use a soldering iron to "heat-sert" the bolts into the slides. Speaking of the soldering iron, I suggest using it to press the bolt heads into the slide bottoms. I did that and it worked great. You want a snug fit on this, and the part was designed for a tight fit. I screwed the shafts in until the hex heads were positioned just against the hex holes, lined up in the right orientation, and then pressed the hot iron against the bolt head until it slid into place.
-
As always, use at your own risk. Although proper use of a featherboard can make sawing/routing a bit safer, all use of a table saw or router table always carries some inherent risks, some of which cannot be completely removed simply by use of an aide. I am not responsible for any injuries sustained while using this design.
PS: knobs shown in pics were from an earlier version (4 pointed instead of 3 pointed, and curved on top instead of flat).
(Product links are affiliate links, when possible.)
If you like my designs and benefit from them, consider thanking me by buying me a cookie through a gift sent at: https://paypal.me/douggjoseph