Model originally uploaded to Thingiverse at https://www.thingiverse.com/thing:4979221.
Updates2021-10-07 Added a Flsun Dragon bowden connector - see Notes section at the end 2021-10-11 Added Volcano magnet spacer if reusing stock magnet holder 2021-10-11 I've now tested the design with the plate printed with ABS printing Polycarbonate filament at 280C and it has held up perfectly with no deforming
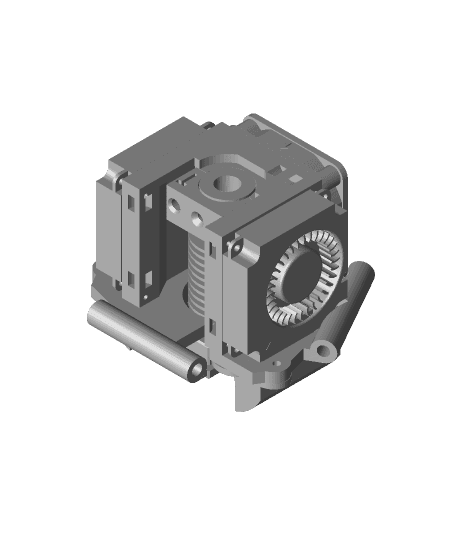
Flsun Q5 Universal v6 Effector - Double Blower
This is my second completely new effector for the Flsun Q5 delta printer for mounting any v6 hotend that conforms to the E3D V6 standards using the grooved mount.
The difference this time, is that it's grown an additional blower fan for better part cooling. It's also simplified in the number of parts and construction.
This includes the E3D V6 itself (tested), V6 clones (tested) and the newer Dragon (tested) and Dragonfly hotends (not tested) from Phaetus and sold through companies such as TriangleLab.
Additional mounts and components included for direct Phaetus Dragon hotend attachment (tested) (i.e. without the groove mount adapter), as well as a E3D Volcano hotend (tested).
This effector has been built from a blank sheet and has gone through several iterations to get to this point.
There are two major components:
The Effector PlateThis has been designed to take M3x5mm thread inserts (6 in total) to connect to the delta arms. As this is the part nearest the heat block and in contact with the heat sink, it needs to be printed in a heat tolerant filament. Testing has shown ABS and ASA are probably the minimum you will be able to print it with. It can be printed without supports.
The plate has been tested to 280C with only minor glazing of the surface. To go hotter will require a more heat tolerant filament such as PA-CF.
The CageThe cage attaches to the effector plate using 4 M3x12mm. The cage supports the heatsink by clamping to the V6 grooved mount using 2 M3x16mm screws. It needs to be printed with a filament that is strong and that can repeatedly take threaded screws. This means PLA is fine, normal PETG probably won't as it's too flexible. For best results, Carbon Fibre filled PLA or even better, CF filled PETG do best.
It does not need to be particularly heat tolerant as it only come into contact with the heatsink at the cold end of the grooved mount. It is also being cooled by the hotend fan.
Tolerances are important when printing this components. Supports are not needed.
As an alternative, the Phaetus Dragon cage has been included to provide a more stable platform for that hotend. The groove mount must be removed from the Dragon hotend so that the 4 connecting screw holes are exposed.
Additional componentsSeparate Fan Ducts are available for the E3D standard hotend and the Volcano hotend configuration.
Hotend cooling fan duct modified from: https://www.thingiverse.com/thing:4572660
Part cooling fan ducts modified from: https://www.thingiverse.com/thing:2814127
Bowden connector created anew for the Dragon cage from: https://www.thingiverse.com/thing:1993384
You can either re-use the magnetic mount for the Z-Probe, or use the included Magnet Holder which will require 2 more M3 thread inserts and 2 more M3x8mm screws. The Volcano Magnet Holder will need an additional 2 M3 thread inserts. If you are reusing the magnetic probe you will need to add the Volcano spacer that is included to clear the nozzle. Using this will require 2 M3x16 screws.
The included magnet holder uses a 20x10x3mm magnet. This needs to be a North pull magnet with countersunk screw holes. This is the one used here: https://www.first4magnets.com/rectangular-c35/20-x-10-x-3mm-thick-x-3-5mm-c-s-n42-neodymium-magnets-4-2kg-pull-p3651#ab_1_1|ps_2_3391
Separate Magnet Holders are available for the E3D standard hotend and the Volcano hotend configuration.
As with the effector, the fan ducts and the magnet holder need to be printed from a heat tolerant filament such as ABS, ASA, etc.
ConstructionFor a standard V6 hotend, print: 1 x Flsun_Q5_v6_plate.stl 1 x Flsun_Q5_v6_cage.stl 1 x Flsun_Q5_v6_clamp.stl 1 x Flsun_Q5_v6_magnet_holder.stl 1 x Flsun_Q5_v6_fan_ducts.stl
Substitute where necessary if you want to use a different hotend (i.e. Dragon cage, or Volcano fan ducts and magnet holder).
Use appropriate filament as outlined at the top.
For the brass inserts you will need a soldering iron heated up to around 50C below the low point of the filament recommendation. Place the insert on the soldering iron tip and gently press into the appropriate hole (6 on the effector for the arms, 2 on the magnet holder). The inserts should be pushed into the 4mm holes until they are flush. Be very careful after pushing in the inserts, they will be very HOT for several MINUTES afterwards and can easily burn you. Do not twist the inserts as you push them in and be careful to not pull them out as you withdraw the soldering iron.
The order the components are put together matter, so to avoid having to unscrew them multiple times:
-
If using the included magnet holder, attach the magnet to the holder and then screw to the reverse side of the effector using 2 x M3x8mm screws. Otherwise, screw on the magnet holder from the original effector.
-
Screw the part cooling blower fans and the hotend fan to the cage using 4 x M2x8mm and 2 x M3x8mm screws. Use only two screws per fan and use the same holes for each fan (i.e. top-left and bottom-right), this prevents them from interfering with each other. Also take care with the fan cables and rotate and route as needed.
-
Screw the cage and fan ducts to the effector using 4 x M3x12mm button cap screws. This is done by putting the screws through the fan ducts and then through the plate and into the cage. If the fan ducts lift too much, there is a third hole on each one to screw directly into the plate using 2 x M3x8mm button cap screws.
-
Insert the hotend through the effector from the bottom and push onto the semi-circular groove mount. The heater block on the other side of the effector should point away from the magnet holder.
-
Fix the hotend to the cage using the clamp using 2 x M3x16mm screws. There is a T marked on the top of the clamp which should face up (i.e. Top) to ensure it grips the hotend groove mount correctly.
-
If the hotend is able to rotate, screw a M3x8mm or shorter screw through the hole in the hotend fan mount onto the grooved hotend mount. Do NOT overtighten this as you will strip the created thread. NOTE: Using this screw is likely to mark the hotend.
-
You will need to either solder the two blower fan cables together and crimp on a new JST SM 2.5mm female terminal, or make a 2 male to 1 female JST SM cable so that the single wires for the blower fan from the motherboard power both blower fans.
Lastly, there are zip tie holes on the cage to safely attach and route the cables through.
Printer ConfigurationYou then need to attach the new effector the the printer arms and connect the cables, bowden tube and clip. Once completed the following steps must be performed after switching on the printer:
-
PID tune
-
Delta Calibration
-
Z-Offset
-
Bed Levelling UBL
-
Load filament and print an XYZ cube to make sure it is properly configured
10 x M3 threaded brass inserts (6 x effector arms, 2 x magnet holder, 2 x Volcano magnet holder) 5 x Flat capped M3x8mm screws (2 x magnet, 2 x magnet holder, 1 x hotend grub - optional) 4 x Button capped M3x12mm screws (cage) 2 x Button capped M3x8mm screws (cage - optional) 2 x Flat capped M3x16mm screws (hotend mount) 2 x Button capped M3x12mm screws (hotend fan) 4 x Socket capped M2x8mm screws (part cooling fans)
1 x 4010 24v Axial Fan 2 x 4010 24v Centrifugal (Blower) Fan 1 x 2 male to 1 female JST SM cable as shown
1 x 20mmx10mmx3mm North Pull magnet with countersunk screw holes
NotesThe Copy_of_Flsun_Q5_Effector_V6*.stl files are for reference only, they cannot be printed directly.
If you use the Dragon cage I would strongly recommend using the Flsun Q5 Effector v6 Dragon bowden connector that I've added instead of a PC4-M10 connector. The one included prevents the bowden tube from moving about within the connector which can cause filament breaks and jams.
If you are building for a Volcano hotend and reusing the stock magnet holder, you will need to print the Flsun_Q5_Effector_v6_Volcano_stock_magnet_spacer.stl so that the Z-offset probe clears the nozzle incase it is hot.