Introducing the Thangs Sync Client Bulk Uploader
Use this Tutorial to automatically update your model metadata from a CSV file
Thangs Product Updates
Use this Tutorial to automatically update your model metadata from a CSV file
Hello! Today, I’ll guide you through the latest addition to the Thangs Sync client: the Bulk Uploader.
This innovative feature caters specifically to power designers seeking enhanced control and automation over their model definitions. With the Bulk Uploader, you can efficiently edit metadata for your models, including descriptions, categories, and tags. This tool extends the capabilities you’re accustomed to with Thangs Sync, putting you in complete control of defining and managing your models. Additionally, you can select attachments for upload via a CSV file.
Note: The Bulk Uploader will be available from versions 1.8.1 and on. If you’ve already downloaded Thangs Sync then your app should have already updated to that version automatically.
🛑 New around here?
If this is your first time using the Bulk Uploader and Sync Client, start with just a few models to start in a Test Folder.
Each Folder in the parent folder represents one model, so run a test with 3 folders for 3 distinct models. All files are uploaded Private so you can view the models before publishing to your Thangs page.
Once you’ve gotten the hang of using the Sync Client with Bulk Uploader, you can proceed to bulk upload your other models using the CSV method.
Getting Started: Set up the Sync Client
1. Open the Thangs Sync app and log in with your Thangs account.
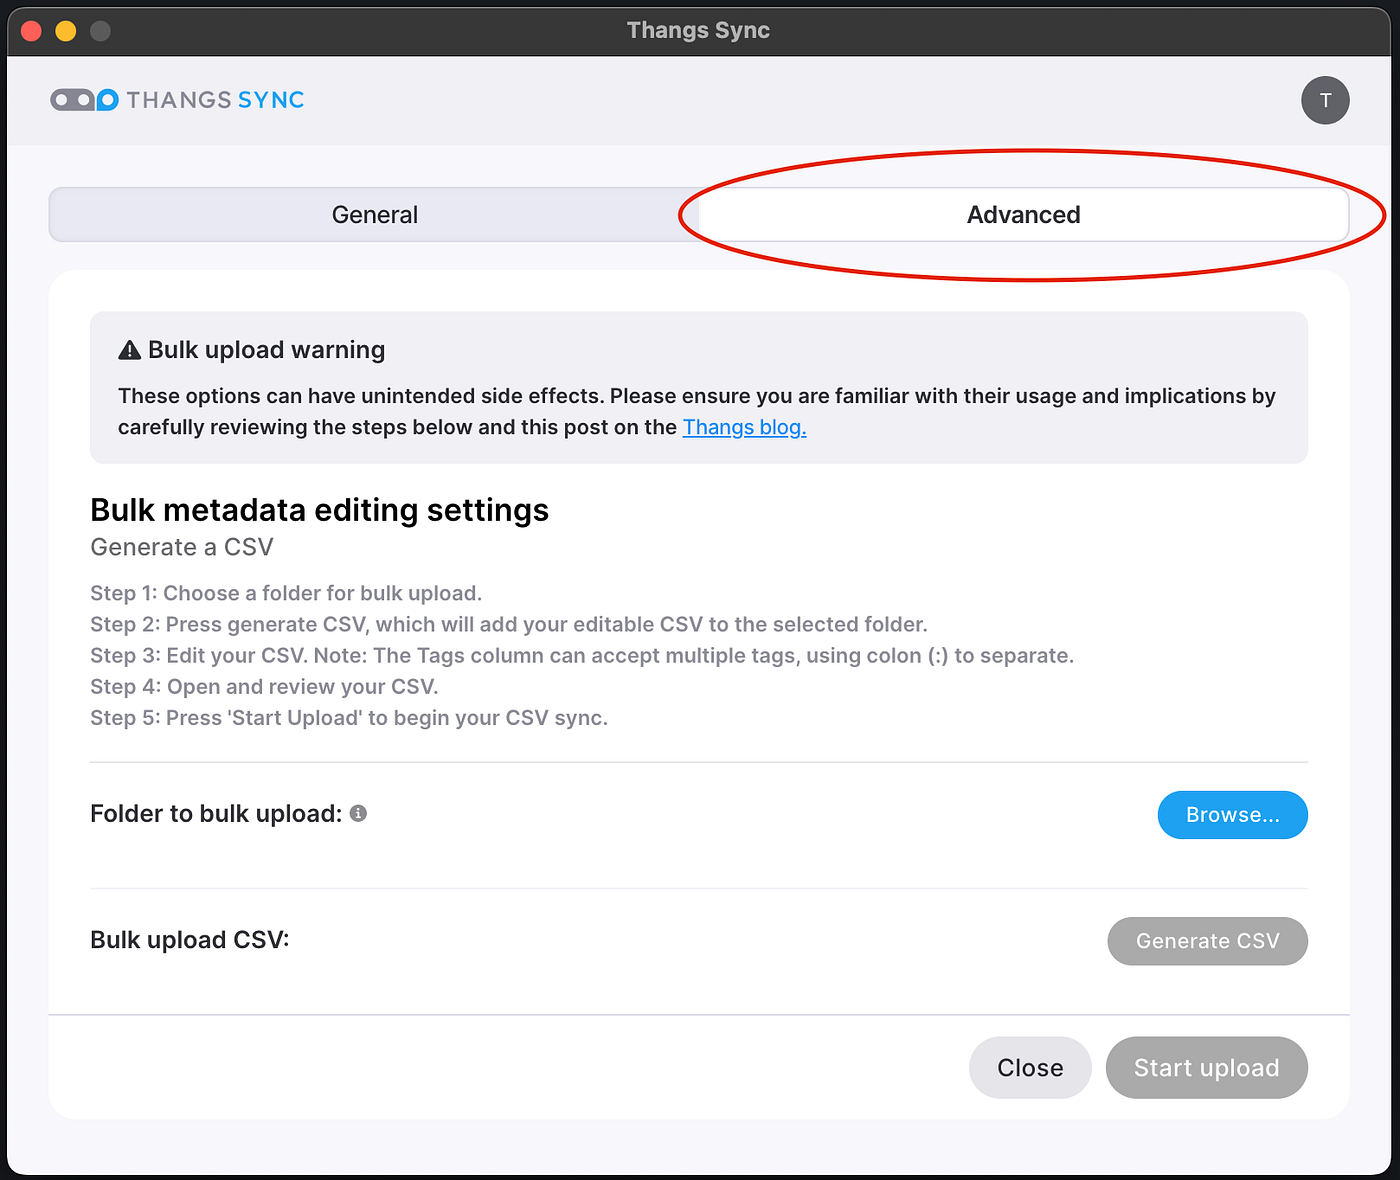
2. We’ve added a new ‘Advanced’ tab on the Settings screen. This is where the Bulk Uploader resides.
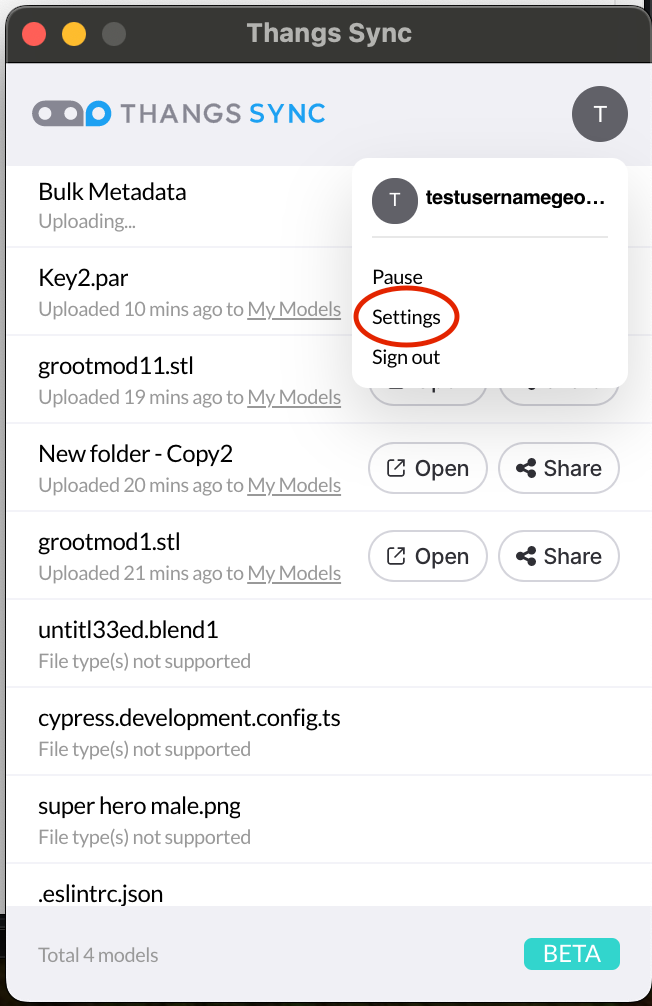
If you don’t see the Settings screen after logging in, you can access it by clicking the drop down in the top right corner and clicking Settings from there as seen in the screenshot below:
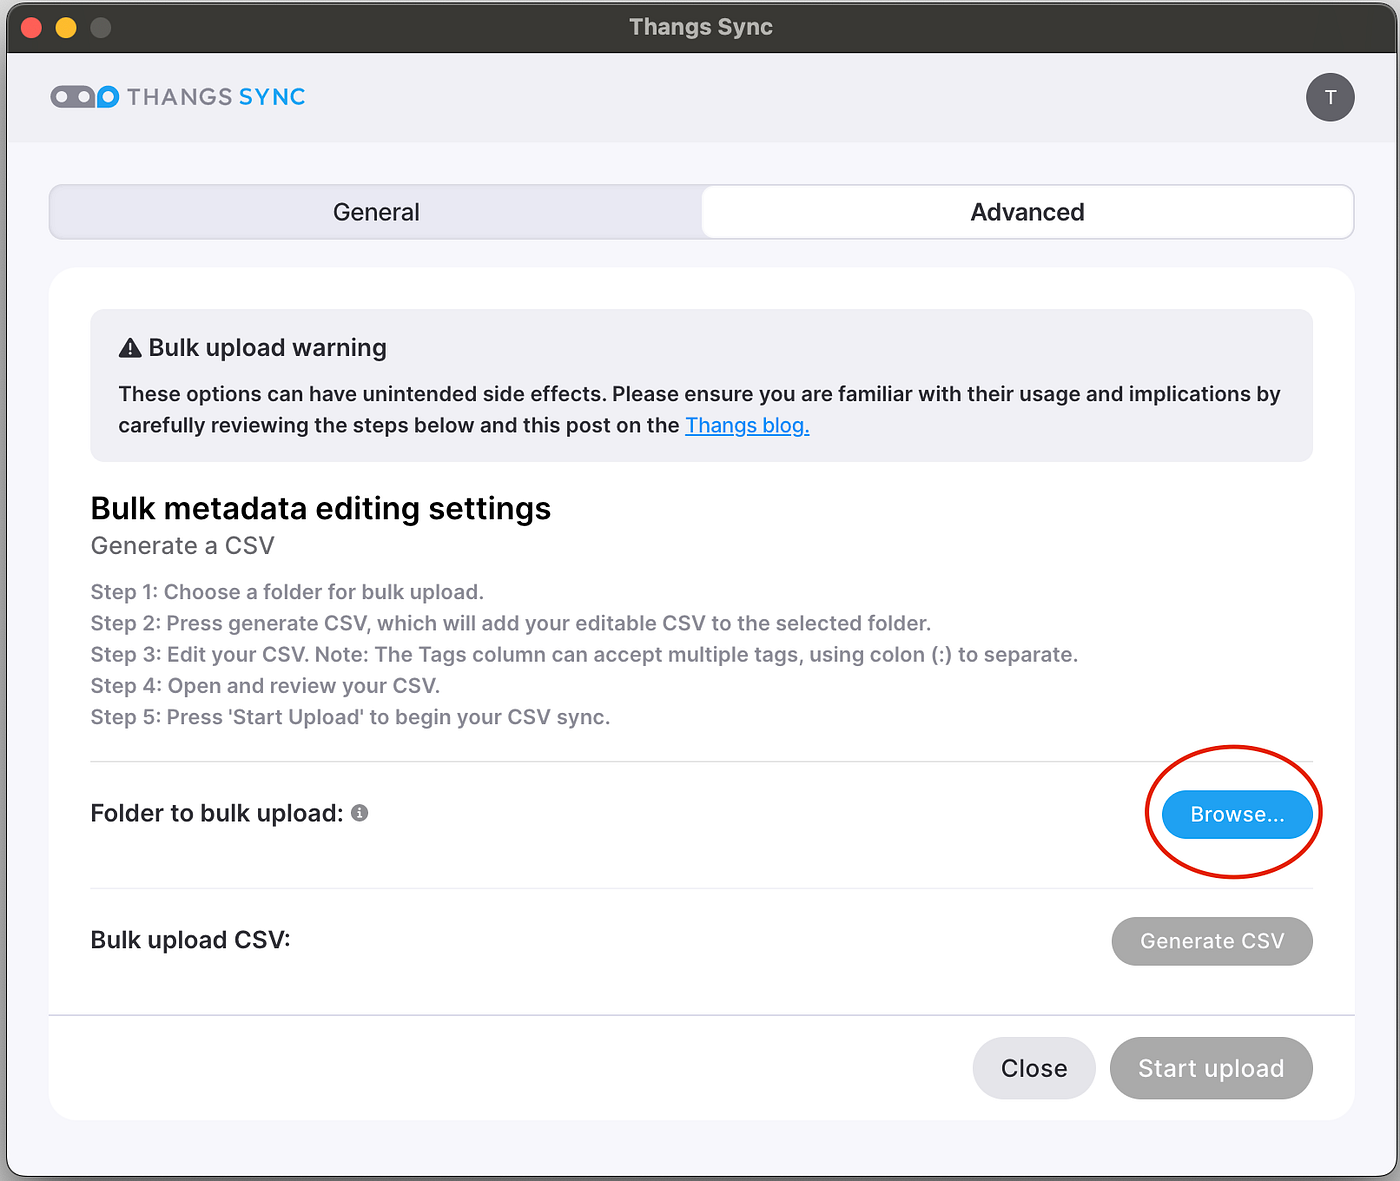
3. The next step is to choose a folder to bulk upload. This folder should have the models that you want to upload. If you haven’t prepared the folder of models yet, you should do that now.
Note: You cannot choose the same folder as your Sync directory on the General tab. You will need to choose a new folder that has models you’ll like to upload.
Note Note: We recommend you choose a folder that you created yourself that has your models.
Is the folder ready? OK let’s go! Press the ‘Browse’ button to choose the folder for bulk upload.
4. Once you’ve chosen the folder you’d like to bulk upload, a Generate CSV button will become available to press. Pressing this button will create a CSV file in the bulk upload folder with the name ThangsBulkUpload-v1.csv
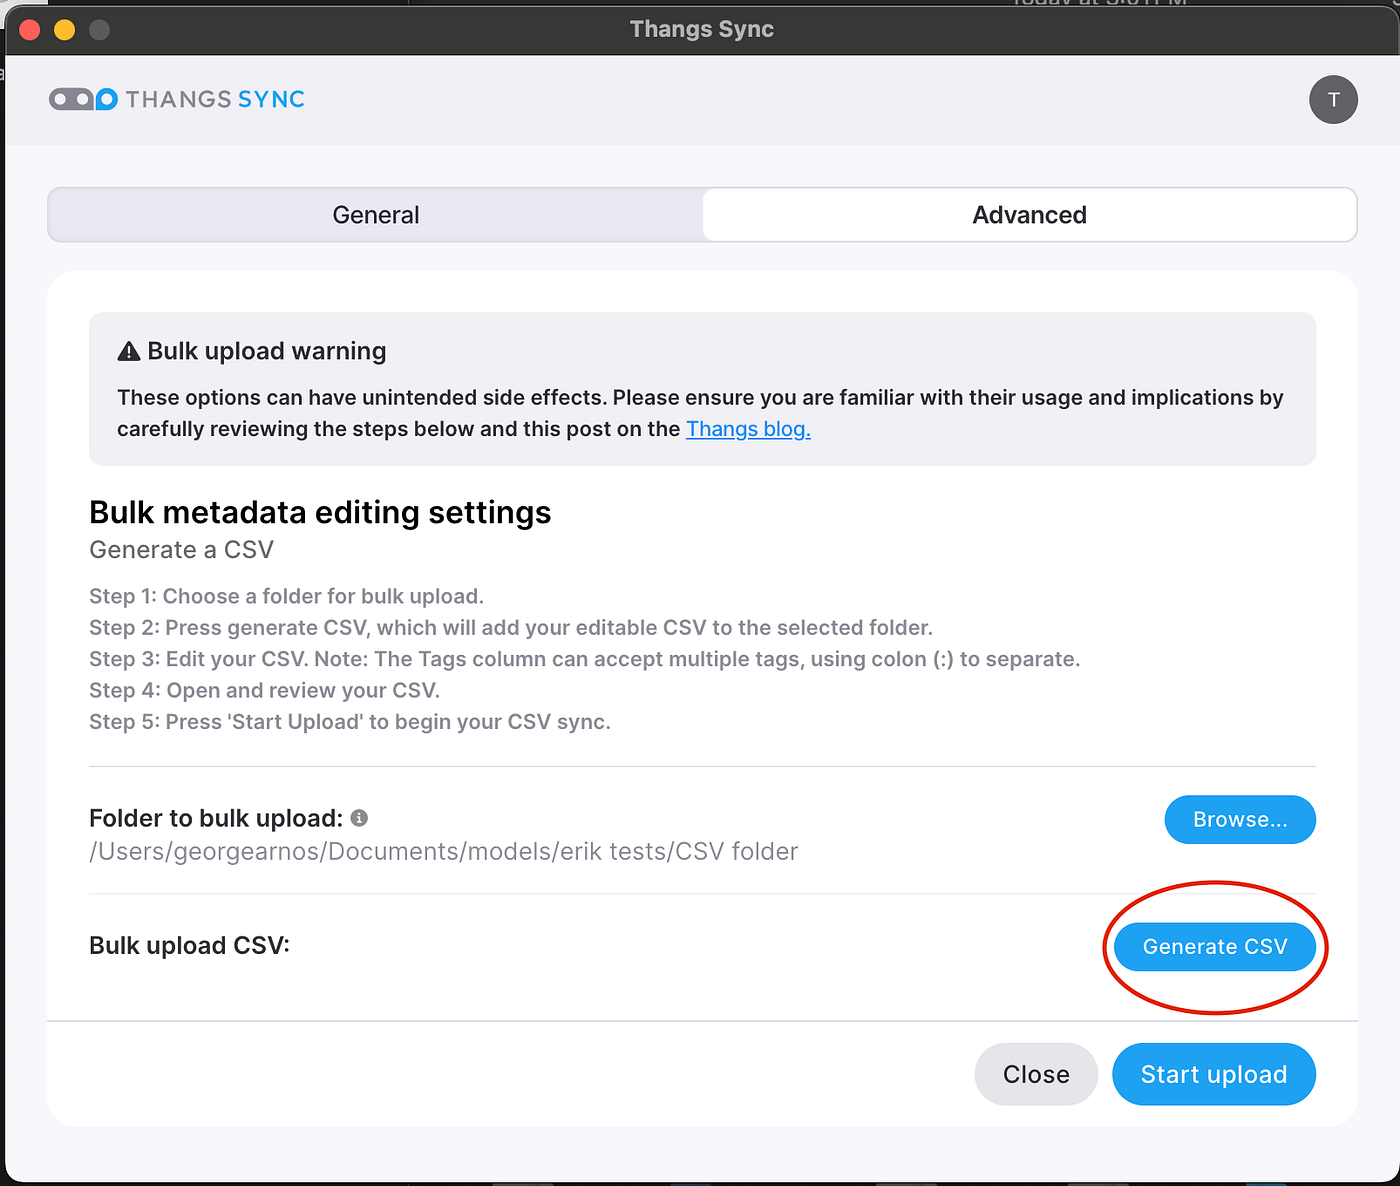
Great! Now you have a CSV that you can edit to let Thangs know what your models are and what metadata data they need to upload with!
The ‘Open’ button will use your system default application to open the CSV file.
Note: We recommend using a CSV editing application like Google Sheets or Microsoft Excel in order to modify the CSV. Editing the CSV with a normal text editor can be difficult.
5. Let’s begin editing the CSV! You’ll see we automatically populated the CSV with all of the files in your Bulk Upload folder and also filled out the ModelName column with model names based on the file names.
Note: Each row in the CSV that has an entry in the ModelName column will be considered one model by Thangs. If it’s a single file, it will be uploaded as a single part model. If it’s a folder, then everything in that folder will be uploaded as a multipart model.
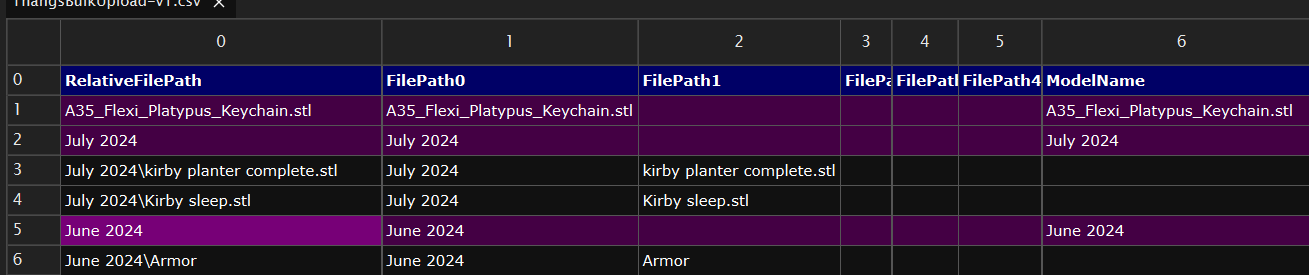
6. Let’s go through the columns in the CSV starting from the left.
- RelativeFilePath: You’ll see the RelativeFilePath column first which has the file path for each file starting from the folder you chose for bulk uploading.
- To the right of that is the same RelativeFilePath separated out into path segments for easy viewing labeled FilePath0, FilePath1, and so on.
- ModelName: Next is the ModelName column which we’ve automatically filled out initially and can be changed to anything you’d like! This is considered a metadata column.
- Description, Tags, Category, and SecondaryCategory: The next four columns, Description, Tags, Category, and SecondaryCategory are all also metadata columns.
- CategoryOptions: The last column is the CategoryOptions column. This column exists to show you what are all the possible options for the Category and SecondaryCategory columns. You’ll need to copy and paste the values from CategoryOptions into either Category and SecondaryCategory.
Note: If you enter a category not in the list we’ll disregard it.
- Tags: Finally, the Tags column. Unlike the category columns, you can type in any tag you’d like.
Note: If you’d like to apply more than one tag to the column, make sure you separate it with a colon (:) Here is an example, toys:cars or jedi:lightsaber:star wars.
Note Note: Only metadata in rows with a ModelName will be uploaded to Thangs. If there isn’t a ModelName in a certain row, then metadata in that row is ignored.
7. With your CSV fully filled out you can begin uploading your model but first make sure you save the CSV after editing it. After it’s saved, let’s begin uploading!
Press the ‘Start Upload’ button to begin uploading. A status indicator will appear on the bottom left to let you know how many models are uploading the current name of the model uploading.
Go ahead and check the My Models section of the Thangs site to see the models after they’ve uploaded!
Versioning Models in Bulk
8. After all of your models have made it up to the site, you can now version any of the bulk uploaded models and you can update the metadata of the bulk uploaded models.
- Let’s talk about versioning first! Example use cases would be if you wanted to add, modify, or remove a part of a multipart model.
- In order to do that, you would need to first make the changes to the model in the folder that it exists in.
- Then just press ‘Start Upload’ again. We’ll check all of your models and only upload the changes that we find to make a new version of the model on the site.
- If you’d like to see the parts in the CSV that you added, you can click the ‘Update’ button. This will look through all of your model files and add or remove files from the CSV. Note: We do our best to make sure all of the metadata columns retain their data as we generate a new version of the CSV. Note Note: We never delete CSV’s or update CSV’s. We only generate a new CSV and increment the version.
- Now let’s bulk update metadata! The first thing to mention is that only metadata in rows with a ModelName will be uploaded to Thangs. If there isn’t a ModelName in a certain row, then metadata in that row is ignored.
- Now that we’ve got that out of the way, go ahead and change the metadata columns (ModelName, Description, Tags, Category, and SecondaryCategory) in the CSV to suit your needs.
- Save the CSV! Then click ‘Start Upload’. Check My Models again to see the updated metadata for your bulk uploaded models.
That’s it! These are new powerful workflows that you’ll need to incorporate into a bulk model upload process.




