Getting Started with Thangs Print On Demand Product Listings
Step-by-step instructions to get started with listing your products in the Thangs Print Store.
Print on Demand is now available to all Thangs designers! This offering which enables Thangs designers to sell products that are produced on demand by our production partner Shapeways in a variety of premium materials and shipped directly to your customers. Print on Demand is a great way to diversify your offerings, reach customers who do not have access to a 3D printer, and offer your products in a wider range of materials.
Once a profile has been created and before submitting models for printability checks, Stripe Express needs to be set up and the account must be verified. Both “Set up payments” and “Start review” can be found under the “Monetization” section in Store Settings.
To begin selling PoD products, head to My Thangs, select a model, and select “Print on Demand -> Make Print Available for Sale”. This process can be done within MyThangs → Actions (…) or on the model page itself.

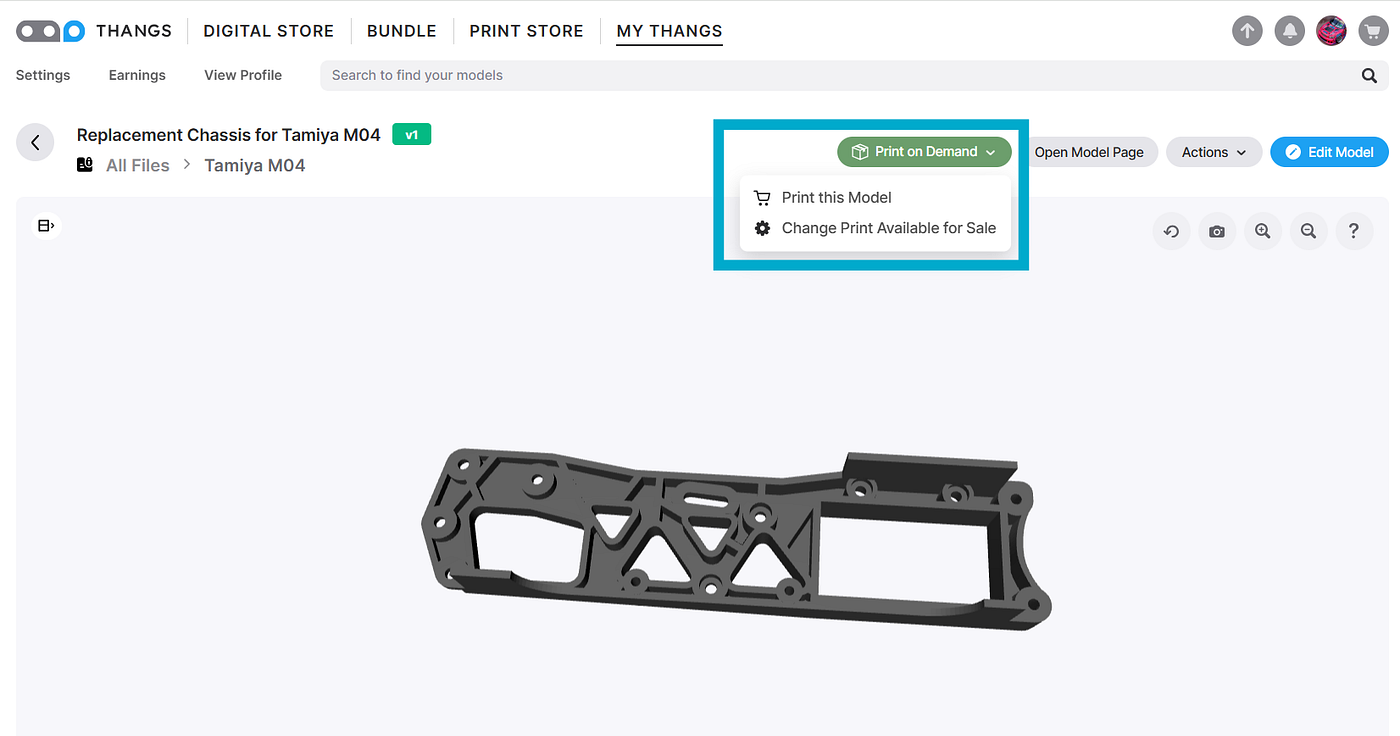
If an error box appears, this means a Stripe Express account has not yet been linked and/or your account has not yet been verified. To move forward with a print quote, go to Store Settings → Monetization and create or link a Stripe Express account and submit your account for verification.

Once “Print on Demand” has been selected, the models and or parts associated with the model can be sent to “Request Print Quote”.
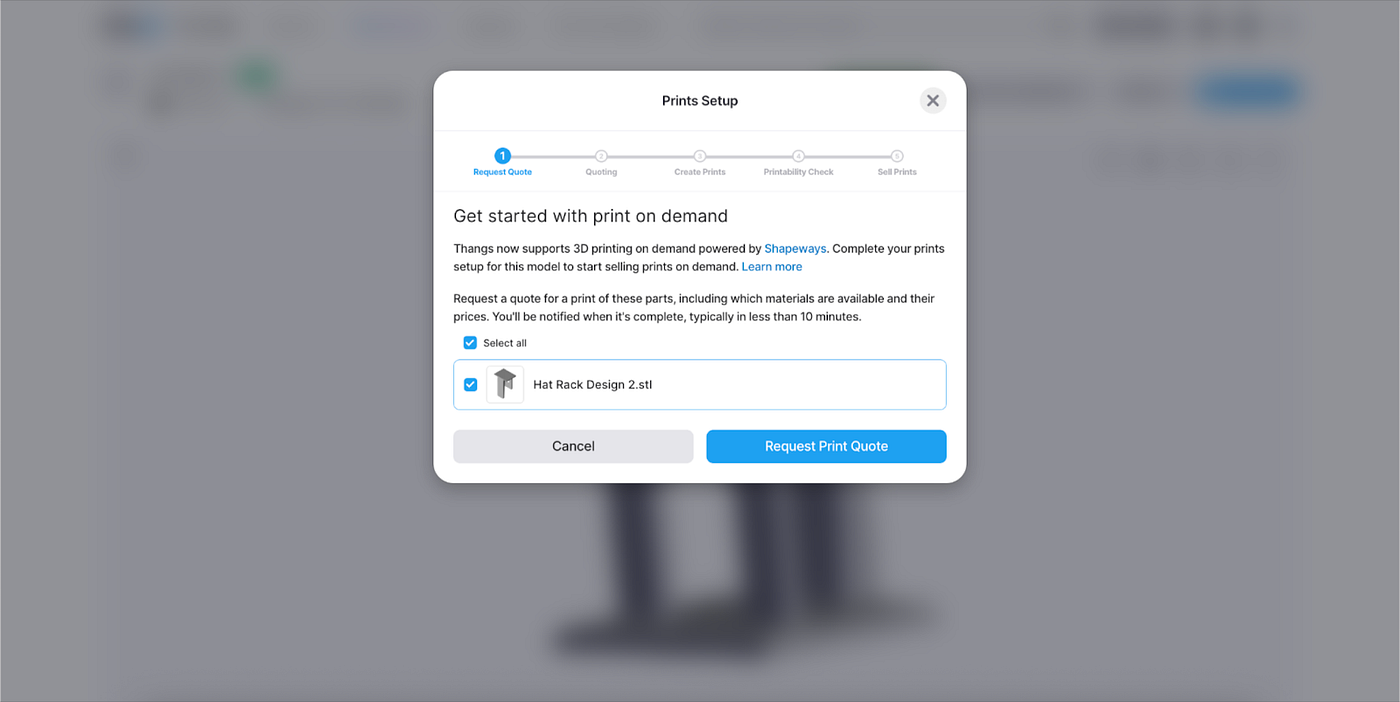
After following the prompts to “Request Print Quote”, a status bar popup will be shown (you do not need to wait and can exit out, but do not click cancel. Also, keep an eye out in the notification center for updates ( 🔔).

After preliminary printability review, the status will be updated and you may continue.
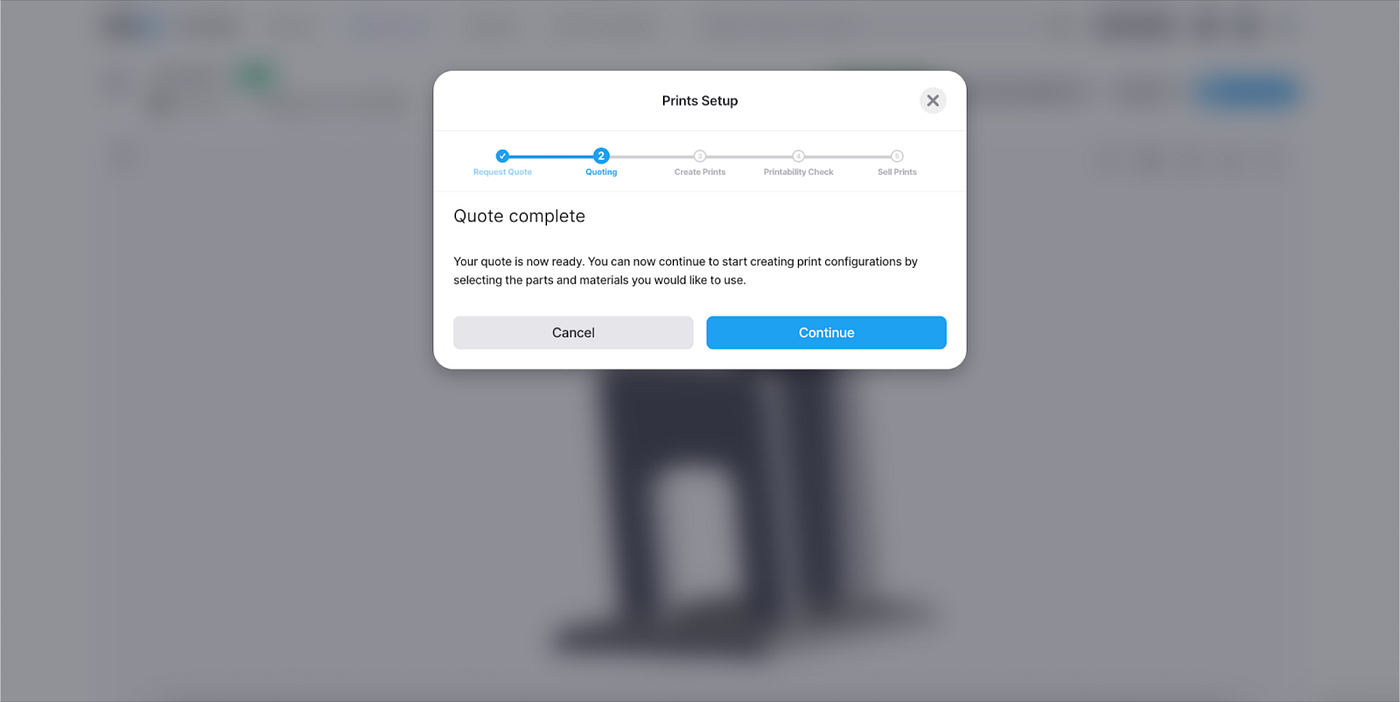
If you exit out of the Prints Setup, you can return anytime by clicking the “Print on Demand -> Change Print Available for Sale” on the model page.
Before the next review process, select the technology/ materials for the products and generate a description which will be the name of the product for the consumer.

Choosing between Variants or Assemblies
When setting up your prints, your choice depends on how you want the customer to receive the final product.
Choose Variants if:
- You are selling a standalone model: This allows you to offer the part in one or multiple different materials.
- You have multiple versions of the same model: Use this for items offered in different sizes or scales. For example, a jewelry ring available in multiple sizes or a model airplane available in multiple scales.
- Note: Each purchase of a variant represents a single item in the customer’s choice of size and material.
Choose Assemblies if:
- You are selling multiple parts as a single set: Use this when a customer needs to receive all the parts together to complete the product.
- Example use cases: RC car kits with multiple components, modular figurines split into several parts, or a planter that includes a separate drip tray.
- Note: Each purchase of an assembly represents a complete kit containing all included parts.
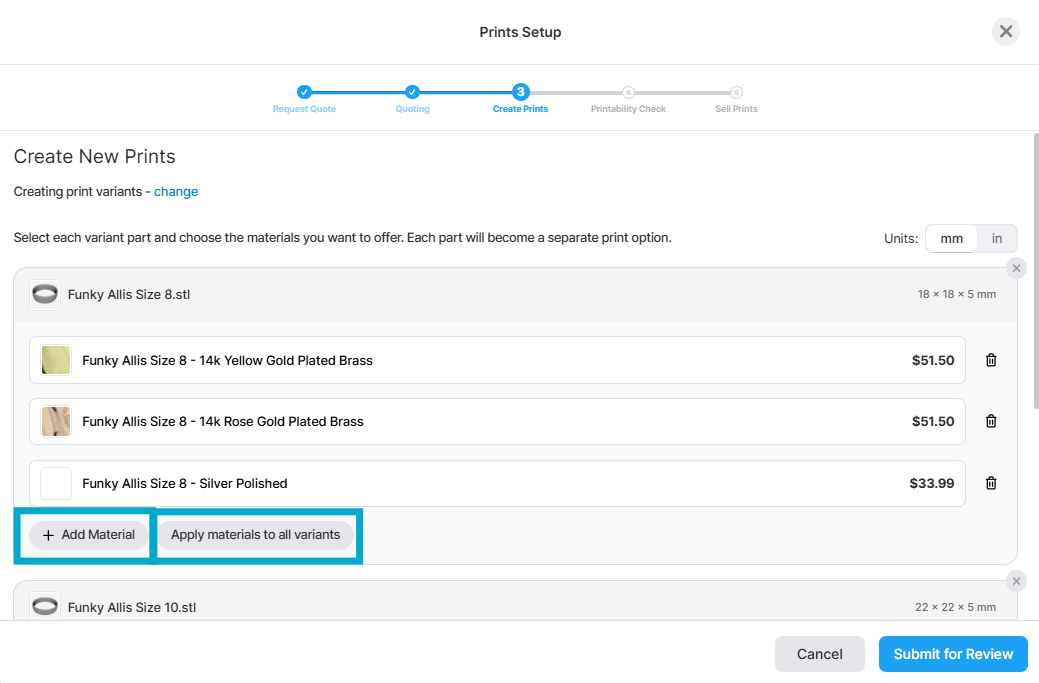
When setting up variants, select the material(s) you would like to have your parts printed in. Use “Add Material” to add additional materials to the same part. Your customers will be able to choose from these materials.
Use “Apply materials to all variants” to add the same selected materials to all other part variants, or set up each variant individually.
You can edit the “Print Description” for each variant & material combination in a later step.
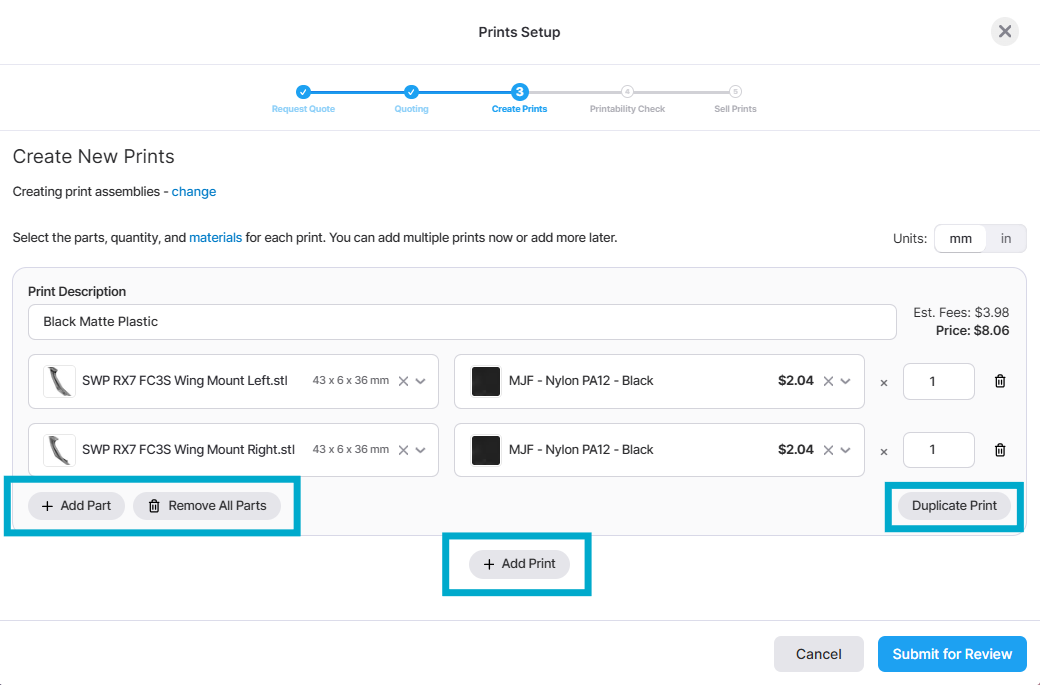
When setting up assemblies, first select which parts and in what quantity they should be combined as one set.
To organize parts correctly, use “Add Part” to add files to an existing product that must be sold and printed together as a single set or kit.
Update the quantity in case multiple of the same part should be included in the set.
Conversely, use “Add Print” or “Duplicate Print” to create a brand new, standalone product that appears as an independent item or set in a customer’s cart.
Simply put: click “Add Another Print” for every new item or set you want to list for sale, and click “Add Part” to add the individual components of a multi-piece assembly.

Next you can set up the material for each part and each print. If you hover your mouse over one of the selected materials you will have the option to “Apply to all parts” within the same print or even to “Apply to all parts in all prints” for a faster material selection.
You can optionally edit the “Print Description” for each assembly as well. This is beneficial for your own organization as well as help clarify to yoiur customers what is included in the assembly.

Once all prints are created and the material groups and materials have been selected, click “Submit for Review”. This will engage the next printability check for the selected materials.
Please allow one business day for this process.

At this point, the product description can be edited, markup added/ edited, and attributes added or edited. Use the $ or % toggle to switch between editing the markup in fixed amount or percentage over the base price.
Make sure to click “Save” before editing another print.

Optionally you can add custom attributes to your prints. This is especially helpful when you have a lot of variations of your product. For example if you sell jewelry in lots of ring sizes and material options, or have a miniature in multiple different scales.
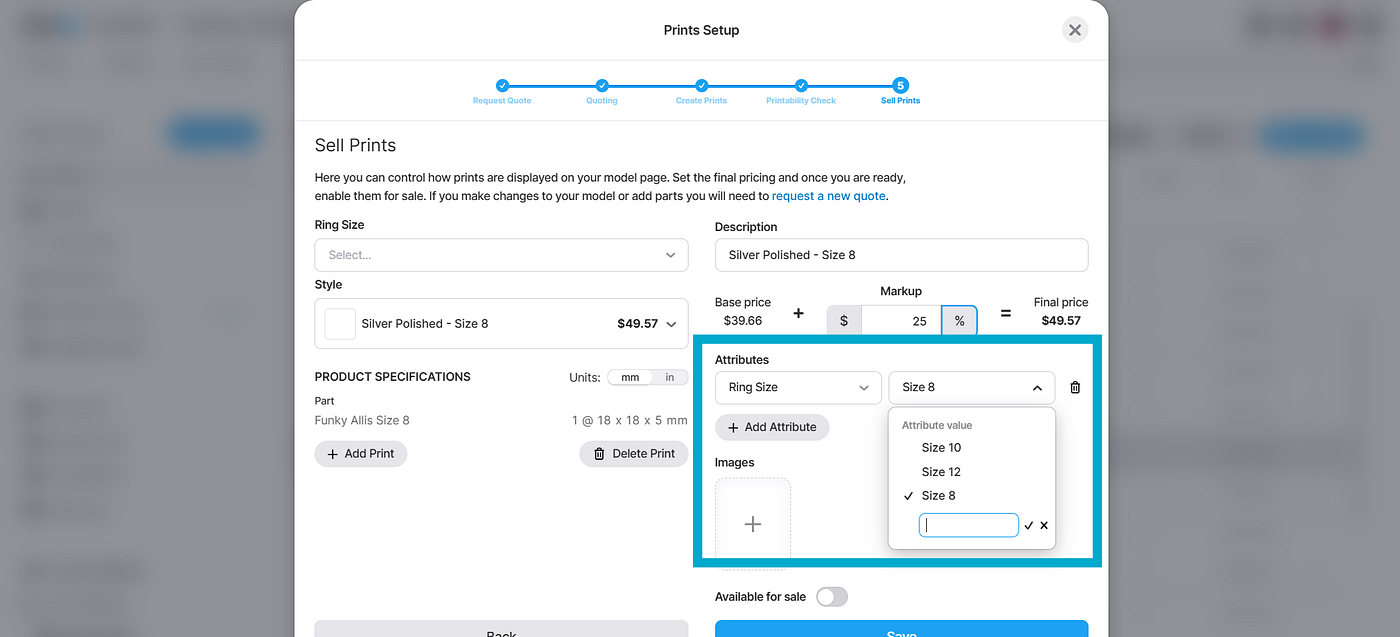
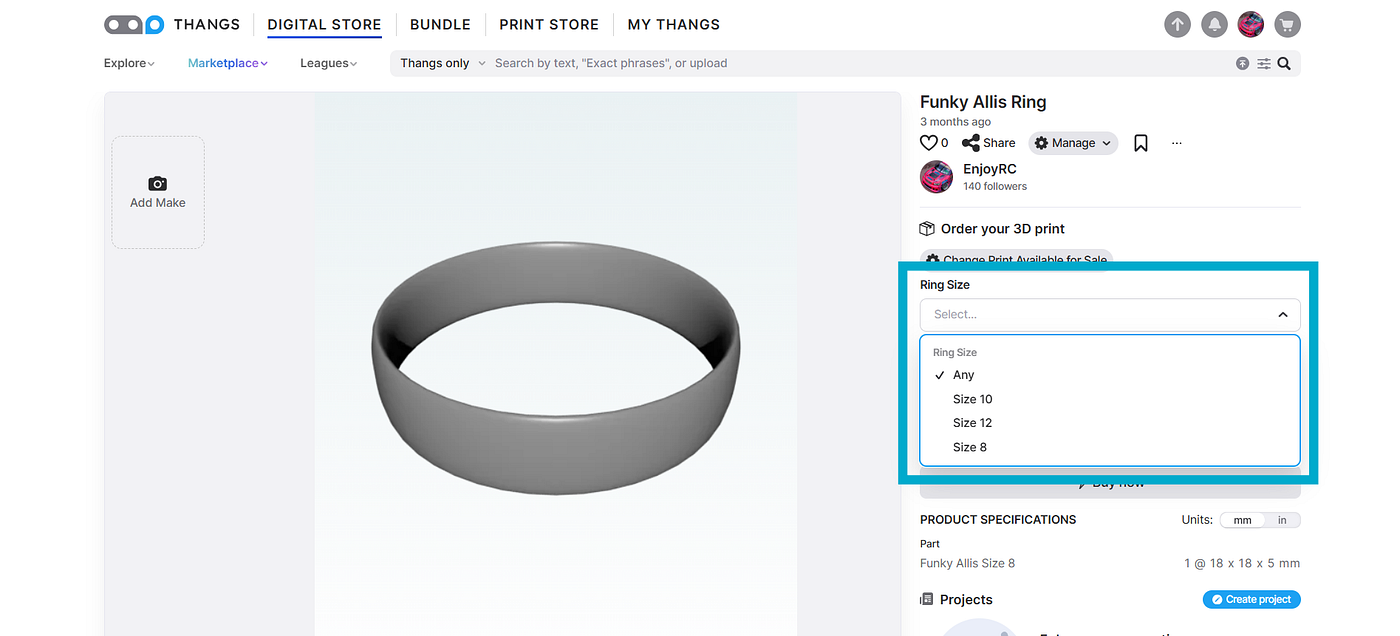
These attributes will show up as a filter that your customers can use to filter through the multiple options you offer your model in.
The toggle “Available for sale” will not be accessible until the last printability check has been completed.

Once printability check has been completed, click back into the “Print on Demand” setup. It’s now time to make the product available for sale.
Additionally, more product options can be added with “+Add Print” or outdated and unneeded prints can be deleted with “Delete Print”.

To make sure your products are available publicly, you also have to make sure the Audience setting in the Model Editor is set correctly.
The Audience setting determines how your work is discovered and purchased: selecting “Private” will prevent the model from being published entirely, even if your Print on Demand setup is complete. “Print Only” allows you to exclusively sell physical versions of your work without offering digital file downloads.
If you wish to offer both physical prints and digital files, simply choose any of the other public audience settings; once your Print on Demand configuration is finalized and marked as available for sale, the option to purchase a physical print will be added as an additional choice alongside your digital model.

Congratulations! Your models are now officially listed for sale on Thangs as physical prints. You should be all set to start reaching new customers — happy selling!