This is included in the welcome pack for all my commercial tier members!
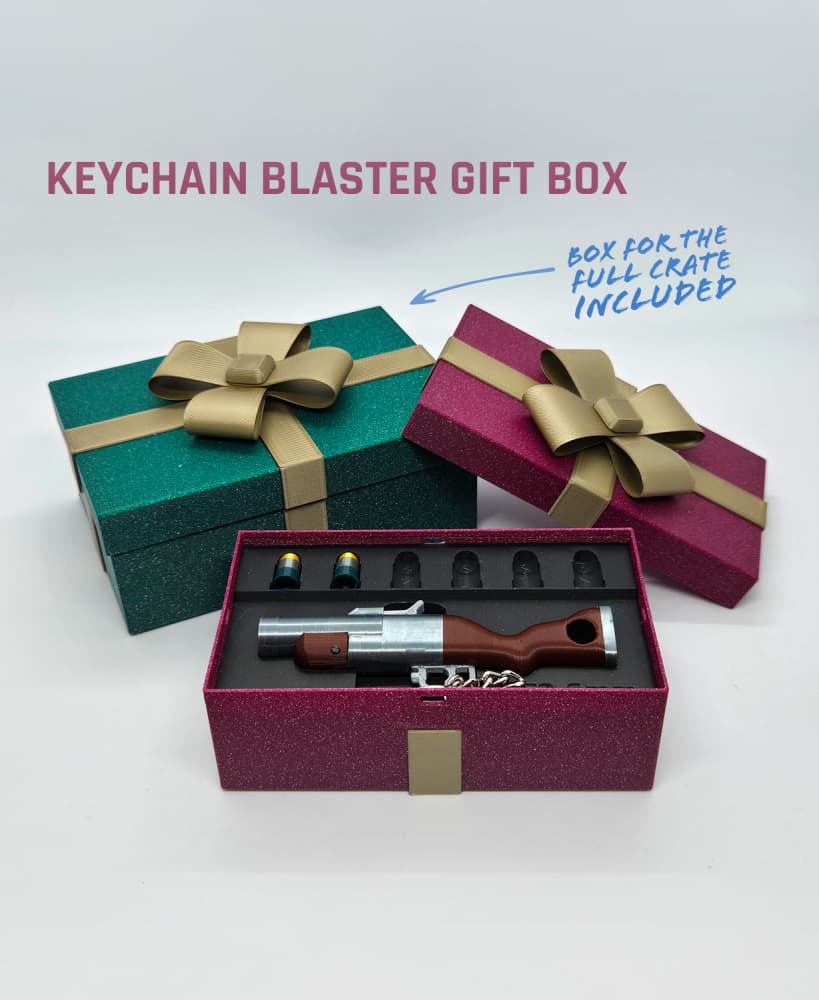
Check out the Modern Keychain Blaster Gift Crate — a modern version of a weapon gift/display container!
Check out the Keychain Blaster Gift Box that uses the inserts from this design!
This military weapon crate inspired hinged and latched gift box is perfect for gifting or selling any and all of my Keychain Blasters!
It comes with an insert for each Keychain Blaster I've released (and I will be adding one for each I release) that has appropriate slots for ammunition and key ring.
It also works nicely without the insert for all kinds of small bits and bobs!
Updates:
2024-11-22: Added insert for Kar98k Bolt-action Rifle.
2025-01-08: Added insert for M41A Pulse Rifle.
2025-03-13: Added insert for MAC-10.
2025-03-18: Added insert for Pump Shotgun.
2025-04-20: Added insert for Flintlock Pistol.
2025-06-03: Added insert for Barrett M82.
2025-09-04: Added insert for AK-47.
2025-09-13: Added insert for Bolt Action Rifle V2.
2025-09-20: Added insert for M1911 Pistol.
2025-11-18: Added insert for Minigun V2.
2026-03-25: Added insert for Desert Eagle. Separated the crate parts and inserts into their own .3mf project files.
2026-05-06: Added insert for Super-Shorty.
Printing tips:
No supports needed. All parts are oriented optimally in the files.
I recommend printing the latches slow and steady with "precise walls" enabled to make sure the filament holes are not too small.
Use low layer height or adaptive/variable layer height for the lid to minimize layer visibility on the sloped parts of the lid bars.
You can print the inserts with low percentage Lightning infill to save time and material.
If you use Bambu Studio or OrcaSlicer, a handy print project file is included!
Assembly:
Use a piece of 1.75mm filament as pins for the hinges in the lid and latches, as well as for the catch bar for the latches. Use a drop of superglue at the ends. See the project article in the Projects section of this page for example pictures.
Then glue the corner deco plates onto the crate corners and you're done.
If you enjoy my designs and want to sell prints of them, I have membership tiers with commercial license available! Also if you want to support me while getting access to all my premium designs, I have a cheap personal tier. Please check out my membership plans! ❤


Thank you for the awesome work you do! Is there an insert for the V2 mini-gun?
I have now added the insert for the Minigun V2!
Thanks! I haven't had time to make the insert for the V2 yet, but I'll try to work on it soon!
I just want to thank you for the work you did on these! I go to an airsoft event every December and it is Fallout like role playing event called Rev in Virginia. I dress as a post apocalyptic Santa and hand out 3d printed coal and stockings full of candy. I also hand out 3d printed toys. These mini guns will be a huge hit this year!! I have signed up for the full subscription to your Thangs account to help support more projects in the future.
That sounds so awesome! Too bad I don't have any really post-apocalyptic models (yet 😅). If you have any ideas for models or pictures of the event to share (I would love to see!), please feel free to join my Discord or just message me through Thangs!
And thank you for the support!
How do we find the crate for Barret M82
The insert should be there among the files as STL and also in the .3mf project.
If you've downloaded the files before the Barrett update, please download again.