
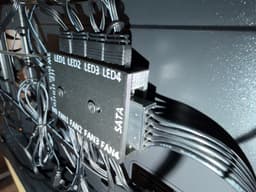

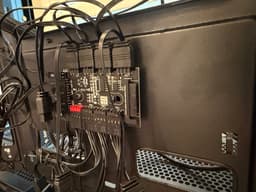
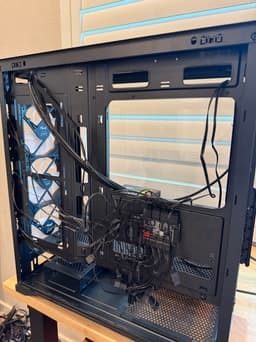

Rosewill ACA502B FAN/LED Controller Enclosure
🛠 Introduction The stock fan controller PCB in the Rosewill ACA502B is left completely exposed inside the case. Besides looking unfinished, it leaves the board vulnerable to contact with surrounding cables and makes it difficult to remember which connector goes where during installation or future maintenance.
To solve these issues, I designed a precision-fit enclosure that completely surrounds the fan controller PCB while adding clearly labeled port names on the front of the enclosure. The result is a cleaner, more professional-looking installation that protects the controller from accidental contact with nearby wiring, helps reduce the possibility of electrostatic discharge (ESD) from exposed components, and makes reconnecting fans quick and intuitive.
The enclosure has been carefully modeled to match the dimensions of the original PCB, ensuring a snug, secure fit without interfering with the case or side panel.
📦 What's Included
This model consists of three files:
enclosure_front
enclosure_front_text (for multi-color printing with an AMS)
enclosure_back
The front and back pieces feature a precision peg-and-hole snap fit for easy assembly. Once assembled, the enclosure is mounted to the case using the original mounting locations, where two screws permanently secure everything together for a solid, worry-free installation.
Unlike the factory enclosure, which uses two M3 × 5 mm screws, this design requires two M3 × 20 mm screws using the same original mounting holes.
✨ Features
Designed specifically for the Rosewill ACA502B fan controller PCB.
Precision-fit enclosure modeled directly from the PCB dimensions.
Clearly labeled front ports for quick and accurate cable installation.
Protects the exposed PCB from accidental contact with surrounding wires.
Helps reduce the risk of ESD caused by exposed electronics.
Gives the interior of the case a cleaner, more professional appearance.
Precision snap-fit design combined with screw mounting for maximum security.
Does not interfere with installation or removal of the case side panel.
🖨 Print Settings
Recommended Material
PETG (recommended)
PLA
Print Settings
Layer Height: 0.20 mm
Infill: 10–15%
Supports: Not Required
Multi-Color Printing (AMS) If you would like the lettering to print in a different color, simply print the file marked "enclosure_front_text.3mf" using your AMS or multi-material printer.
If you're printing in a single color, use enclosure_front instead.
🔧 Assembly Instructions
Print enclosure_back and either enclosure_front or enclosure_front_text.
Place the fan controller PCB into the enclosure.
Align the front and back halves and press them together until the peg-and-hole snap features fully engage.
Install the completed enclosure into the original mounting location inside the Rosewill ACA502B.
Secure the enclosure using two M3 × 20 mm screws.
The snap-fit keeps the enclosure aligned during assembly, while the mounting screws permanently secure it to the case, ensuring it remains firmly in place.
🛠 Removal
If you ever need to remove the PCB from the enclosure, use a pair of needle-nose pliers. Carefully insert the tips near one side of the enclosure and gently spread the pliers outward to release the snap tabs. Repeat for the opposite side until the enclosure separates without placing unnecessary stress on the PCB.
🤝 Collaboration & License
I enjoy creating practical upgrades that improve both the functionality and appearance of existing hardware. If this enclosure helped your build, I'd love to see your completed project or hear your feedback. Suggestions and improvements are always appreciated.
You're welcome to share, remix, and modify this design for your own personal projects.
License ✅ Sharing is encouraged.
✅ Modifications and remixes are welcome.
✅ Attribution is required.
❌ Non-Commercial.
If you publish a modified version, please credit the original author and include a link to the original author's page so others can find the original design and future updates. This helps ensure improvements remain connected to the original project and benefits the entire community.
Thank you for respecting the work that went into this design, and happy printing!
Rosewill ACA502B FAN/LED Controller Enclosure

Rosewill ACA502B ATX Tower Feet Replacement

Tonex One Controller Enclosure for ESP32-S3 4.3" Touch LCD
Ender 3 control enclosure

The $100 DIY Temp Controlled and Filtered Printer Enclosure Upgrade
Fan PWM Controller Mount for the Universal 3D Printer Enclosure by 3D Sourcerer
Light Up Flower Pot using LED Strips
Fume Extractor
Octoshield Case for Raspberry Pi 4 for Prusa Mk3
T12 Soldering Iron Station Makita Battery
#ThangsBambuContest P1P Enclosure
Open Back Switch Box for Lack Enclosure V2

Nintendo Switch OLED Dock Rear Cover with Fan
Ender 3, Ender 3 Pro Electronics Enclosure (Updated)
Dimmer Mounting Box
Oven Controller Box with PID and Timer

Ultimate MIDI Controller

KlipperScreen Enclosure

Zoo Med Environmental Control Center Vertical Wall Mount

PRUSA MK3S Front panel for DSI OSOYOO 3.5" touch screen
