.PNG&w=3840&q=85)
.PNG&w=256&q=75)


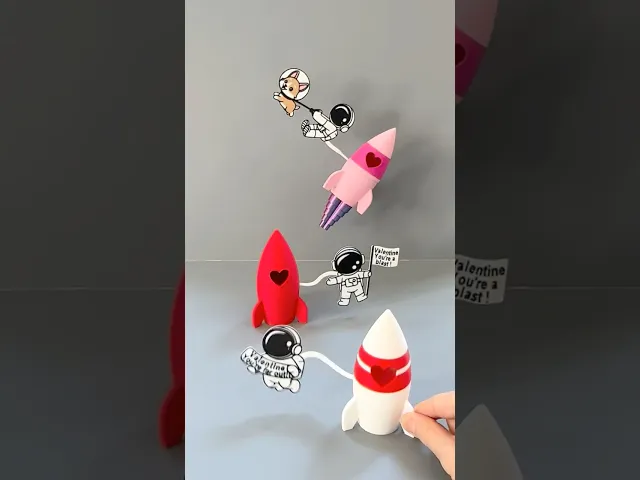
Heart Rocket with Floating Astronaut Cards for Valentine's Day
It’s been a year since I designed my “Rocket with Boosters” and I thought it’d be fun to do a Valentine themed version 😍 This rocket is larger than my original, prints in two pieces (that connect with magnets), contains a heart shaped booster, a heart window and a few floating astronauts to help spread the love 💕 The floating astronaut ‘cards’ fit into the middle of the rocket and can easily be removed. Also, I have measured the rocket cabin and it can hold 3 Hershey kisses in case you’d like to add a few for your valentine 🍫
Important: You will need (6) 6x3 mm neodymium magnets for each rocket (3 for the top of the rocket and 3 for the bottom of the rocket)
Here is an Amazon link to the magnets I used: https://amzn.to/3WDvOhd
3D Print Settings for the Heart Rocket:
PLA and/or PETG works great 0.2mm Layer Height 15% Infill Supports needed on Heart Rocket_top piece only
How to print rocket parts:
- Print the Heart Rocket_top with supports. In my print profile I selected tree (manual), ‘Tree Organic’ supports and I adjusted the Top Z Distance to 0.275mm to make them easier to remove (I did this because no matter what filament I used the supports were abnormally hard to remove on this piece but adjusting this setting made all the difference:)
- You can print the Heart Rocket_bottom with or without boosters. I prefer to print my boosters separately (and make sure to print them first:) and then pause the print and insert the ‘pre-’printed booster.
- The astronaut ‘cards’ print flat. Because they are thin it is easy to ‘deform’ them if you peel them off the print bed when they are still warm. For this reason, let them cool completely first and then remove them from the bed. To re-shape or twist the astronaut 'hose', reheat the bed to 60F and lay the piece on it for a few minutes to heat it back up (so it is moldable) and then twist the hose into shape. (See photo for how to bend the astronaut’s hose to 90 degrees)
How to insert magnets into the Heart Rocket_top piece:
- Pause the print at layer 20 (layer height 4.00 mm) and insert the magnets
- Make sure they are all the same ‘direction’ and orientated how you would like them (in relation to the Heart Rocket_bottom piece)
How to insert magnets into the Heart Rocket_bottom (with boosters) piece:
- Pause the print at layer 203 (layer height 40.60 mm).
- Add a very small drop of super glue into each magnet hole and insert the magnets. This helps to keep each magnet in place so they don’t jump out when the print resumes and stick to the metal print head. (See photo)
- Make sure they’re all the same ‘direction’ and orientated how you would like them (in relation to the Heart Rocket_bottom piece)
- Resume the print
How to insert boosters & magnets in the Heart Rocket _bottom (no boosters) piece:
- Pause the RocketHeart_bottom (no boosters) print at layer 194 (layer height 38.80 mm)
- Insert the heart booster and then resume the print
- Pause the print (again) at layer 203 (layer height 40.60 mm)
- Add a very small drop of super glue into each magnet hole and insert the magnets. This helps to keep the each magnet in place so they don’t jump out when the print resumes and stick to the metal print head. (See photo)
- Make sure they are all the same ‘direction’ and orientated how you would like them (in relation to the Heart Rocket_bottom piece)
- Resume the print
How to shape the ‘oxygen hose’ of the astronauts:
- Heat the print bed up to 60F
- Lay the card on the print bed for a few minutes to warm up
- Then place the circle end of the card flat against the bed (holding it firm and flat) and with your other hand twist the “hose” 90 degrees
- Let it cool completely before securing it to the rocket bottom
- When cool, attach it to the rocket bottom
- Finish by adding the rocket top 🚀
I have also included a 3MF file with the following print profiles:
Print plate #1 Heart Rocket_top (plain) 1 color, print paused at layer 20, tree supports added Print plate #2 Heart Rocket _top (one stripe): 2 colors; pause added at layer 20 to insert magnets, tree supports added Print plate #3 Heart Rocket_top (2 stripes): 2 colors, pause added at layer 20 to insert magnets, tree supports added Print plate #4 Heart Rocket_bottom (with boosters): 1 color, pause added at layer 203 to insert magnets Print Plate #5 Heart Rocket_bottom (no boosters): 1 color, pause added at layer 194 to insert booster and pause added at layer 203 to add magnets Print Plate #6 Heart shaped booster: 1 color (filament type set to PLA silk but adjust accordingly) Print Plate #7 Astronaut Card #1: 2 colors Print Plate #8 Astronaut Card #2: 3 colors Print place #9 Astronaut Card #3: 4 colors
Have fun printing! 💕 Erin
Heart Rocket with Floating Astronaut Cards for Valentine's Day

Alphabet Layered Fidgets

Big Beads: Sports Themed

Cupcake & LED Candle Set (with Cupcake Stand and Magnetic Match)
Spill the Tea Fidget

Football Layered Fidget

Potted Flowers and Watering Can

Flower Stand for Potted Flowers with Watering Can

Pixel Flower Fidget (2 sizes) with Stems, & Vases (3 styles)
.JPG&w=3840&q=75)
Fidget Fabric Fried Egg Set (play or coaster set)

Twisty Pint Fidget (2 Styles)

Clicky Phone Fidget (2-in-1 Fidget)

Fry Pan, Spatula and Fork

Green Eggs (requires mesh fabric), Slinky Ham and Plate

Number & Symbol Big Beads (for Horizontal and Vertical Stringing)

Big Letter Beads
Slinky (2 sizes)

Pear Spinner Fidget
.JPG&w=3840&q=75)
Carrot Garden (2 sizes)
.JPG&w=3840&q=75)
Planter Box and Dirt Bed for All Veggie Fidget Garden (2 Styles)
.JPG&w=3840&q=75)