


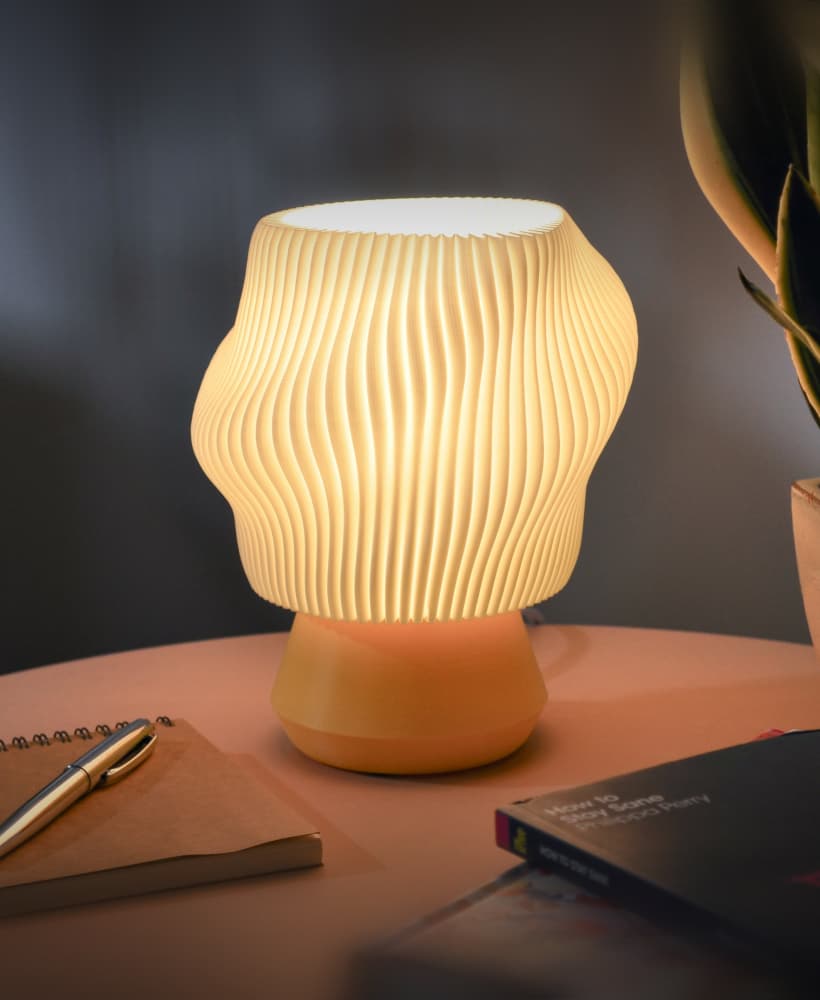
CL-1 Opal Table Lamp
A minimalist desk lamp designed around the principles of simplicity, clarity, and purposeful design. The printed opal diffuser produces a soft, even glow, while the cylindrical body conceals the lamp's internals within a clean, uninterrupted form. Designed for SLA printing, the CL-1 celebrates precision, honest construction, and enduring design.
I recently got my hands on Anycubics Photon P1 resin printer and wanted to make something for my desk. I used to work as a lighting repair technician so I decided to work with what I know and build a simple lamp.
I opted for a e26 base socket instead of an LED integrated design so I could place the light source vertically in the column instead of in the bottom shining up or at the top shining down. If one really wanted to use a LED puck I believe the design could be altered to accommodate this.The rotary switch I picked just works with no distraction. I looked at a dimmer variety but felt it could cause issues with bulb compatibility and opted to keep it simple.
One thing I did not include here is a weight to add to the base. I used a small copper ingot for my light because I had one laying around but don't expect people to have such a thing around their homes. Lamps can be weighed down with lamp weights, ballast filled with sand, steel bb's, tire weights, spare change or even a decent size rock. It's not 100% required but it will give the lamp a little more weight to prevent it from going flying off your desk should you knock it.
**Bill of Materials: **
- 165 grams ANYCUBIC ABS-Like Pro 2 Resin
- 1x GB Rotary Lamp Switch
- 25mm Threaded Nipple (3/8" IPS, usually found in your hardware stores lighting section)
- Porcelain Candelabra Socket with 12-in Leads and Ring, 125V, 75W, (I used the LA1154 by Atron with a short hickey on the base)
- 2-wire light duty lamp plug (or 3 wire, most small lamps use 2 and no ground)
- 3x Wago 221's or small wire nuts.
- 6-8 ft of lamp cord.
- 4x 6mm rubber pads with adhesive. (for feet)
- 1x zip tie (for strain relief on the cord inside the base. You can also just knot the wire so it doesn't come out of the base.)
Other items (nice but not needed)
- Heat shrink tubing (for securing your wire nuts.)
- Primer & Paint for the base if you're getting fancy.
- A weight or ballast of some kind to give the lamp some mass.
Printed Items: All of these should be printed at an angle with the closed ends towards the plate with medium supports. The knob can be printed with light supports.
- 1x Knob
- 1x Base
- 1x Shade
FDM Printer owners:
I did not make any design considerations for FDM printing so if you are going to print it on a filament printer I can not promise it will work.
Assembly instructions:
- Insert threaded nipple into hickey on bottom of your socket. Then thread it into the center hole of the base.
- Install switch through the hole on the front of the base with the retaining ring on the outside and the nut on the inside sandwiching the wall to hold the switch in at your preferred depth.
- Feed your assembled power cord with the end installed through the bottom of the base so 3-6 inches of unstripped wire remains in the base. Tie a knot on the wire or add a zip tie to prevent the wire from sliding back out.
- Wire black lead from your power cord to one lead on the switch. Then take the second lead on the switch and wire it to the black lead on your socket.
- Wire the white lead from the power cord to the white lead on your socket.
- Ensure your connectors of choice are secure and wrap with some electrical tape or heat shrink tubing.
- Put in a light bulb.
- Insert and twist the shade.
- Plug it in and turn it on.
- Enjoy.
This should go without saying but I am going to put this here anyways:
Safety Warning and Disclaimer The CL-1 Opal Table Lamp project is intended for experienced makers and hobbyists who are familiar with the safe assembly of electrical devices. This project involves working with electrical components. Improper assembly, modification, or use may result in electric shock, fire, property damage, serious injury, or death. Always disconnect power before assembling, servicing, or modifying the lamp. It is your responsibility to ensure that all electrical components, wiring, power supplies, and finished assemblies comply with the electrical codes, safety regulations, and certification requirements applicable in your country or region. Use only components that are appropriate for the intended voltage and operating conditions. This project is provided for educational and personal use only. By choosing to build this lamp, you acknowledge that you do so entirely at your own risk. The designer and publisher of these instructions assume no responsibility or liability for any injury, death, loss, damage, or other consequences arising from the construction, use, misuse, or modification of this project. If you are not confident working with electrical equipment, consult a qualified electrician or experienced technician before attempting this build.
CL-1 Opal Table Lamp

Zoan Table Lamp - Coral Table Lamp - Parametric Lamp & 3D Printed Lamp for Home

Pinn Table Lamp - Dragon Egg Table Lamp - Parametric Lamp & 3D Printed Lamp for Home

Riva Table Lamp – Woven Table Lamp with Curved Surface – Parametric Lamp & 3D Printed Lamp for Home

Voronoi Table Lamp – Nature Inspired Voronoi Pattern Table Lamp – Parametric Lamp & 3D Printed Lamp

Honeycomb table lamp, Honeycomb lamp, Smart table lamp

Zoan Table Lamp - Flat Coral Table Lamp - Parametric Lamp by Slang

Seamless Table Lamp - Table Lamp for kids’ spaces - Parametric Lamp & 3D Printable Lamp for Home

3D Printables Lamp Model STL, Table Lamp, Bedside Lamp, Modern Desk Lamp

Veyra Table Lamp – Sci-Fi Modern Table Lamp | Futuristic Home Decor

Jongo Table Lamp - Mushroom Lamp - Lamps & Lighting by Lunfardo
Dollop Lamp: Wavy Desk Lamp, Contemporary Table Lamp
Valentin Table Lamp - Mushroom Lamp - Lamps & Lighting by Lunfardo
Tokyo Table Lamp - Japanese Lamps - Lamps & Lighting by Lunfardo

Riku Shoji Table Lamp - Japanese Lamp - Lamps & Home Lighting by Lunfardo
Haru Shoji Table Lamp - Japanese Lamp - Lamps & Home Lighting by Lunfardo

Shota Shoji Table Lamp - Japanese Lamp - Lamps & Home Lighting by Lunfardo

Evil Pumpkin Table Lamp - Halloween Lamps - Lamps & Lighting by Lunfardo
.png&w=3840&q=75)
Musho Table Lamp - Mushroom Lamp - Lamps & Lighting by Lunfardo

Maze Table Lamp - Parametric Lamp Design - Lamps & Lighting by Slang
