
.JPG&w=256&q=75)


Retro Vader - Hueforge Print
20 downloads · 2 years ago · Ayyy, everyone's favourite dad, but in a retro, 70s vibe. Kinda!
This is a super simple print, and
This model is restricted by licensing terms.
View license.
Ayyy, everyone's favourite dad, but in a retro, 70s vibe. Kinda!
This is a super simple print, and you can go crazy with your filament choices since it's kind of a 'just do you' type of print. I used my favourite filament Burnt Titanium on top of black as a background, but you can just ... use either one, or neither or - whatever else you like honestly!
This one takes just 3 hours at 0.08mm layer heights so not too long at all!
Print Instructions Print at 100% infill with a layer height of 0.08mm with a base layer of 0.2mm You may print at higher layer heights below the Min Depth of 0.44mm The Max Depth is 2mm and the Actual Depth is 2.1mm
Filaments Used:
- PLA Flashforge Burnt Titanium Transmission Distance: 4
- PLA Phaser3D Purple Transmission Distance: 5
- PLA BambuLab Basic Pink Transmission Distance: 6.6
- PLA TECOR Light Blue Transmission Distance: 3.5
- PLA META SUNLU Yellow Transmission Distance: 6.8
- PLA Kingroon White Transmission Distance: 5.8
Swap Instructions:
- Start with Burnt Titanium
- At layer #8 (0.76mm) swap to Purple Sparkle
- At layer #11 (1mm) swap to Pink
- At layer #15 (1.32mm) swap to Light Blue
- At layer #18 (1.56mm) swap to Yellow
- At layer #21 (1.8mm) swap to White for the rest.
Retro Vader - Hueforge Print
20 downloads · 2 years ago in and
This model is restricted by licensing terms.
View license.

Shelf Studs - Cause you can nail 'em!

Barty the Gargoyle

Apple Pencil 2 Jig for Eufymake
.JPG&w=3840&q=75)
Navessa Allen's Into Darkness Trilogy Inspired Book Nook

Game On Inspired Pen Holder

Gothic Window with Ledge

Oversized Mewtwo Pokemon Card - Hueforge Hybrid

Vi (Arcane) Back Tattoo - HueForge Print

Fortnight - TTPD Christmas Ornament

Caught Up Inspired Helmet/Pen Holder

Reading Challenge Book Trophy

WoodForge - Aztec Style Star Wars Print

Taylor Swift - Life of a Showgirl Flatforge

A Lil Reading Ghost

Terrasen, Velaris and Lunathion Shelf Signs

Babel Tower and HueForge Map inspired by Babel by RF Kuang

Lights Out Inspired Skull / Pen Holder
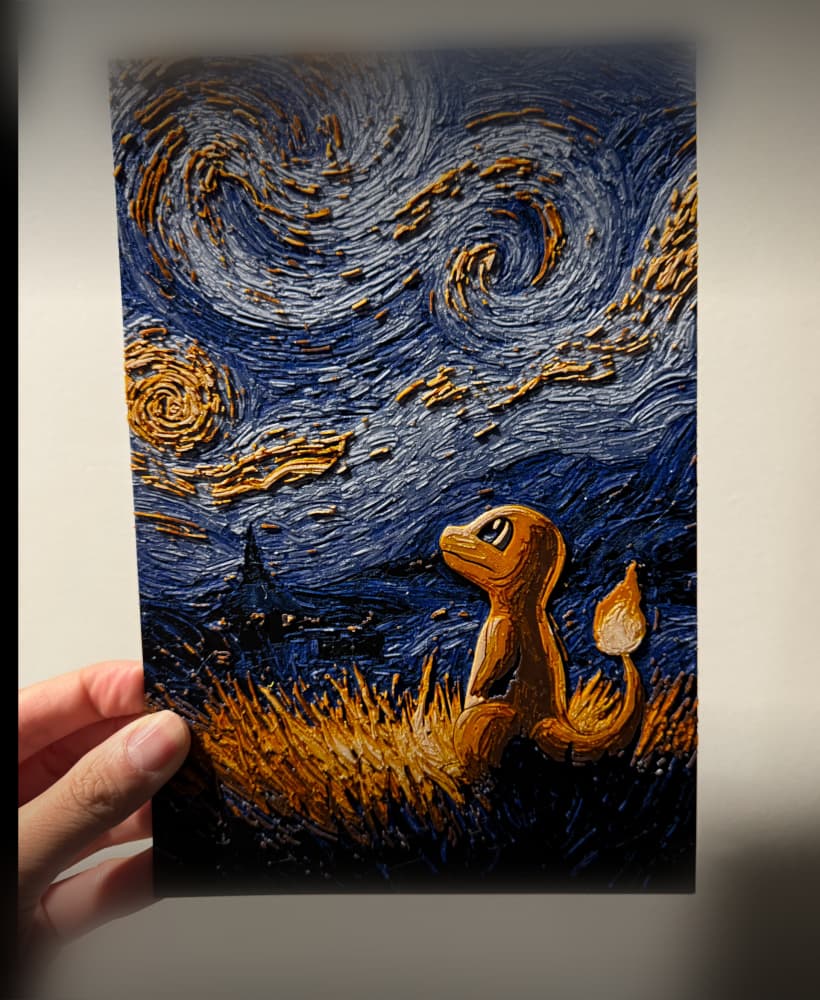
Starry Night Charmander

Starry Night Gengar
