.png&w=3840&q=85)
.png&w=256&q=75)

.png&w=256&q=75)
.png&w=256&q=75)


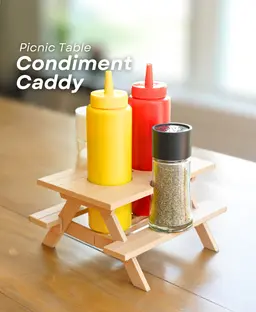

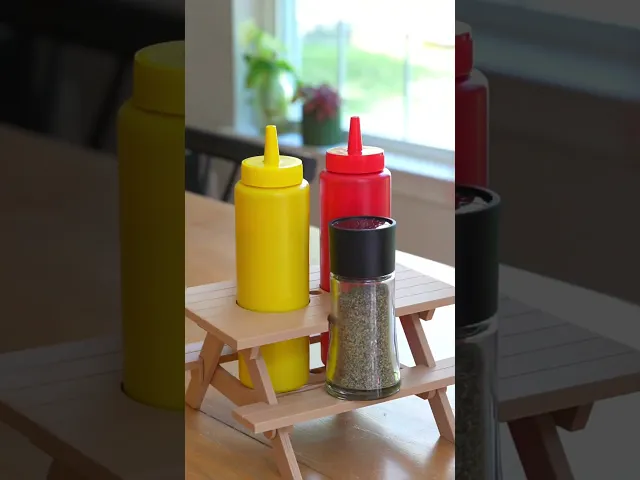
Picnic Table Condiment Caddy
Instructions Hardware Filaments
Picnic Table Condiment Caddy - Intermediate A caddy for your condiments disguised as a picnic table. Perfect for your ketchup, mustard, salt and pepper
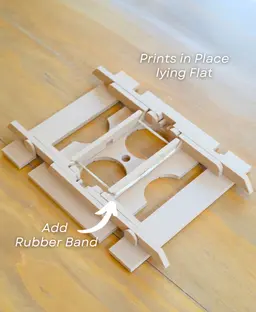
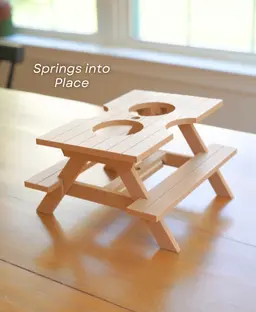
Print in Place Picnic Table The Picnic Table prints in place, ready to fold up. Add a rubber band to the cross beams to allow it to pop into place.
How does it work? A rubber band pulls on the legs to lock it into the upright position. When the table is flattened the rubber band pulls the legs straight together locking them flat. To pop the table up simply hold the table and flip out the legs with a quick motion.
Umbrella Coming Soon I am working on a completely 3D printable umbrella that uses articulating linkages and a rubberband to deploy.
Fabric Tutorial Video: Video


PlayBook'd LUDO

Cactus Cluster

PlayBook'd Tic Tac Toe

Lucky Bamboo Mahjong

PlayBook'd - Go

Telephones Booth

Spinny Succulents - Pack III

Desktop Golf Gen 2
PlayBook'd - Playing Cards

Desktop Dumpster

PlayBook'd Cribbage

PlayBook'd Crosswords

Snack Attack - Gen 2

PlayBook'd Snakes and Ladders
.png&w=3840&q=75)
Date Night Daisy

PlayBook'd Settlers' Storage
Scoopy Stacks

Butterfly Fridge Magnets - Pack II

Playbook'd - Checkers

Hi, for this model, you really dont want to pull it off of the build plate by the tulle. You need to go kind of slow and use a scraper, so the tulle doesn't rip. It can be tedious but it is worth it.
do you have to have that fabric stuff to print the umbrella? you cant just print it up?
The Fabric is needed for the umbrella. It is what holds the printed pieces together. If you try to print it without the tulle all of the diamonds and umbrella bars will not be connected to each other.
nevermind i see your instructions now so sorry
ok i went and got some how do i print with it? videos I've watched say to print 2 layers then put the fabric down and print the rest on top is that what you do with the umbrella too?
Você apenas disponibiliza o arquivo em 3mf? Eu quero o stl para pode adequar as minhas configurações.
We only provide the 3mf. It should open in most slicers and you can change the settings to your preference.
Porquê quando abro o arquivo, na mesa tem alguns retângulos?
Tentei reproduzir e a mesa não abriu, imprimi em petg, provavelmente por isso. Vou tentar em PLA desta vez
I'm not sure what rectangles you are referring to. unless you mean the design I have in there to make it look like the wood boards of a regular picnic table. We design all of our models with PLA in mind so if you want to switch to PETG you do have to make sure you have your setting as dialed in as possible to get the same results.
Infelizmente estou tendo problemas ao imprimir o modelo. As pernas da mesa sempre colam, e fica com dificuldade na hora de abrir e fechar .
Hi! I'm sorryyou're having trouble. You may need to refine your bridge settings or check for over-extrusion if the legs print fised or stuck. sometimes a nozzle can be worn out and cause the over-extrusion and somethimes it is filament settings. I can't be sure which would be causing your issue.
hoe hard d you have to push the arms into the hole?
where are there clear instructions? which way does the umbrella fold its very hard to bend the pieces without breaking. there are not any tabs on the cap for the top? do you cut out the fabric in the middle? how does the rubber band go underneath? the pictures are not that clear to understand. and your video isn't showing you put the umbrella together. I really do not want to break another umbrella - thx
Hi, you will want to cut out the holes in the top of the umbrella so the arms can move freely. The rubberband goes through the umbrella cap under the conector tab, and into 2 of the umbrella holes and then around 2 of the black arms. There are better pictures in the Helpful instructions project page.
Yes but the pull down part of the handle is not correct. I have to insert it upside down and then the pull down handle part is wrong.
The black arms are only meant to be snapped into the holes of the underside of the umbrella. It is not meant to be touching the umbrella fully or to keep the umbrella open completely flat. It stays at a slight angle like a true umbrella. There should be a gap between the umbrella and the pull down part of the umbrella, like in the photos. The rubber band is there to help it stay open. so you shouldn't have to insert it upsidedown.
i printed the table and it was fused (i half blame my printer) i had to use my printer that it fits on and it was completely fused. i have another printer that is more accurate i will try (also with some supports. the problem is it doesn't fit so im gonna cut the legs shorter (its too big by like 2mm each side). any tips on having the table actualy work
I'm having the same problem. I printed the table and the legs were fused together, and when I try to release them, the sides of the legs come apart.
If the table is fusing together it is likely due to the bridge settings or it can be a printer error. if your using a bambu printer with the 3mf then I would think it would be a nozzle issue ands likely the nozzle needs replacing. If you're using a different printer and your own settings, I would run some bridge tests to see if your printer is bridging properly
... i didnt have my bridge setting on... Cura be stupid
I would suggest trying Bambu Studio. It is very user friendly and supports more than just Bambu Printers
i would have printed it on my anycubic kobra 3 but its slightly too big
well I wasn't using the best printer to be honest. it was an old artillery x1 but I can run a bridging test on it.