


Magnetic Tile Haunted House: ROOF
These are the roof pieces for the Magnetic Tile Haunted House.
3D Print Settings PLA Filament works great Layer height 0.2mm Infill 15% No supports need Neodymium magnets needed for all Roof Pieces (except chimney): 20x5x2 and 10x5x2 Neodymium magnets needed for chimney: 10x5x2 OR 12x5x3 Magnetic build plate highly recommended but not absolutely necessary.
Here is a link to Amazon for the magnets needed for these prints: https://www.amazon.com/shop/3dpmom
How to Print Roof Pieces For the roof pieces , you will need to use 20x5x2 and 10x5x2 neodymium magnets only. I strongly recommend using these size magnets. If you go larger it may not allow the magnets to rotate within their chambers.
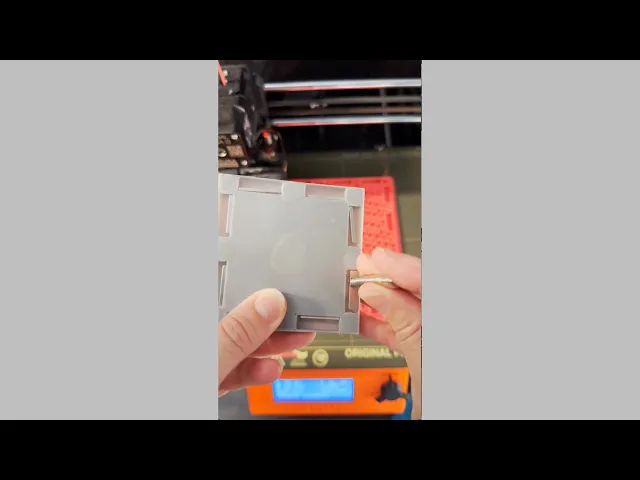
For all of these pieces, add a pause print to insert the magnets as shown in the photos for each design. When the print is paused insert the magnets.
For the Roof Corner Piece, Roof Dormer Piece, Roof Deep Dormer Piece and Roof Panel Pieces you will need to pause the print twice: the first pause will be at layer height 7.8mm; the second pause print will be at 87.2mm.
Note: For the second set of magnets to be inserted at the 87.2mm height you will need to to place a magnet on the outside of the print to hold the ‘inside’ magnet in place. (Otherwise the magnet may ‘jump out’ and stick to the print head.)
After the magnets are inserted/secured, resume the print. When you are done with the print simply remove the magnets off from the outside of the print. That's it:)
I have also included a 3mf print profile with the following print plates: Print Plate #1 (Roof Corner Piece): one color, pause inserted at layer 39 (layer height 7.8mm) AND Layer 436 (layer height 87.2mm) Print Plate #2 (Roof Dormer Piece): one color, pause inserted at layer 39 (layer height 7.8mm) AND Layer 436 (layer height 87.2mm) Print Plate #3 (Roof Deep Dormer Piece): one color, pause inserted at layer 39 (layer height 7.8mm) AND Layer 436 (layer height 87.2mm) Print Plate #4 (Roof Panel Piece): one color, pause inserted at layer 39 (layer height 7.8mm) AND Layer 436 (layer height 87.2mm) Print Plate #5 (150x75 Roof Piece): one color, pause inserted at layer 30 (layer height 6.0mm) Print Plate #6 (75x75 Roof Piece): one color, pause inserted at layer 30 (layer height 6.0mm) Print Plate #7 (75x37.5 Roof Piece): one color, pause inserted at layer 30 (layer height 6.0mm) Print Plate #8 (Chimney): one color, pause inserted at layer 30 (layer height 6.0mm)
Have fun printing!

Twisty Fidget Tree (2 Styles)

Alphabet Layered Fidgets

Big Beads: Sports Themed

Cupcake & LED Candle Set (with Cupcake Stand and Magnetic Match)

Spill the Tea Fidget

Football Layered Fidget

Potted Flowers and Watering Can

Flower Stand for Potted Flowers with Watering Can

Pixel Flower Fidget (2 sizes) with Stems, & Vases (3 styles)
.JPG&w=3840&q=75)
Fidget Fabric Fried Egg Set (play or coaster set)

Twisty Pint Fidget (2 Styles)

Clicky Phone Fidget (2-in-1 Fidget)

Fry Pan, Spatula and Fork

Green Eggs (requires mesh fabric), Slinky Ham and Plate

Number & Symbol Big Beads (for Horizontal and Vertical Stringing)

Big Letter Beads
Slinky (2 sizes)

Pear Spinner Fidget
.JPG&w=3840&q=75)
Carrot Garden (2 sizes)
.JPG&w=3840&q=75)