


Landscaping Fence-3D Printed
3D model description Design Concept My wife was happy with my wine barrel planters (the smallest of the three is shown in one of the pictures here) so she commissioned a landscaping fence. She wanted a white fence but settled for a translucent fence. (it's what I had a lot of). I designed all the parts in Fusion 360 to get the screw holes all in the right places and sizes to be correct.
I had planned on designing an anchor but ended up just using some stakes and screwing the post to them (see picture). Another short cut was the color of the screws and sizes. I used black but kind of regret it. It turned out OK though. I used some screws that were too long as well as I couldn't find the size i needed.
3D printing settings Printing Recommendations To start-sorry you need at least a 350x350 bed plate as some pieces are diagonally at 430mm.
I wouldn't normally duplicate pieces but this is so complex that it just made sense to show all the necessary pieces. I didn't print this as it is setup here, I printed one piece at a time over several weeks (months). A couple of hours or less for each piece. I sometimes grouped many pieces and let it print overnight. Once I got bed adhesion working with glue, it printed without issue.
Utilize a durable material like PETG to withstand elements exposed outdoors. Monitor the adhesion carefully during the printing process, using moderate infill to ensure durability without compromising design details.
Assembly Instructions See attached instructions and pictures. The model is meant to be printed in multiple sections that can be easily attached with M4mm screws. Anchor points may need to be added during installation to secure the fence into the ground firmly.
Nozzle 0.4 Time 5d11h54m Filament, amt PETG, 9376g (10 rolls of 1kg) Speed 200 to 250 except for caps-20 Layer height .28 Wall loops 2 Infill, type 10%, Rectilinear
For CAPS only Supports Enabled for Caps only, Tree(auto) Top Z Distance .6 Minimum Support Contact Area 1
Landscaping Fence-3D Printed
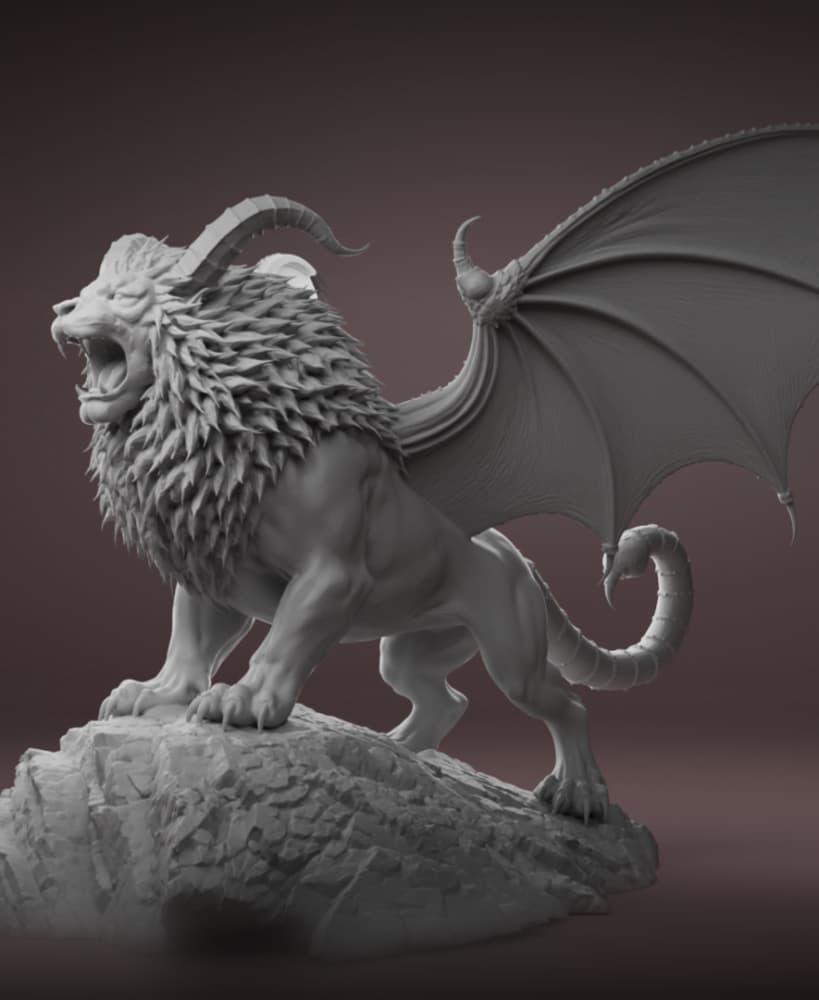
Majestic Manticore Fantasy Creature 3D Print 3D print model

3d print files, 3d printing models, stl file 3d printing, weihnachten, tealight candle, christmas

Furcorn 3D Print Model – From the “3D Printing Your Most Liked Comments” Challenge

Cartoon Angry Man 3D Model Free 3D Print Test Free low-poly 3D print model

Slimy Slug - Fidget Articulated Slug - Ludo 3D Printed Animal - a 3D Printed Animal Fidget

Articulated Movable Flexible Textured Snake Creature Reptile Ball Python 3D-print 3D-printable Print

Sonic Fan Art 3D Print Low-poly 3D print model

Set Cuadros de Montañas – Mountain Wall Art Set STL – Nature Landscape 3D Prints

Muscle Mouse Warrior 3D Print Model Low-poly 3D print model

3D Printed t-28 trojan plane (3D printed with plastic bottles filament)

Drac-la-Bubu Flexi – 3D Printed Dracula Bunny

Homer Simpson Stylized Bust 3D Print Model STL Low-poly 3D print model

Flexi Santa Remb Studios, STL file for 3D printing, STL print files, Print in Place, Christmas STL

The Flow Vase STL 3D Print File, Home Decor Vase for Plants and Flowers, 3D Print STL

Flexi Hummingbird Remb Studios, STL file for 3D printing, STL print files, Print in Place

The Blox Vase STL 3D Print File, Home Decor Vase for Plants and Flowers, Digital Download 3D Print

Flexi Heart with Hanging Legs | Remb Studios, STL file for 3D printing, STL print files, Print in Pl

Jolly Roger - 3d Printed Fabric Flag with pole, and wall mount. Print in Place
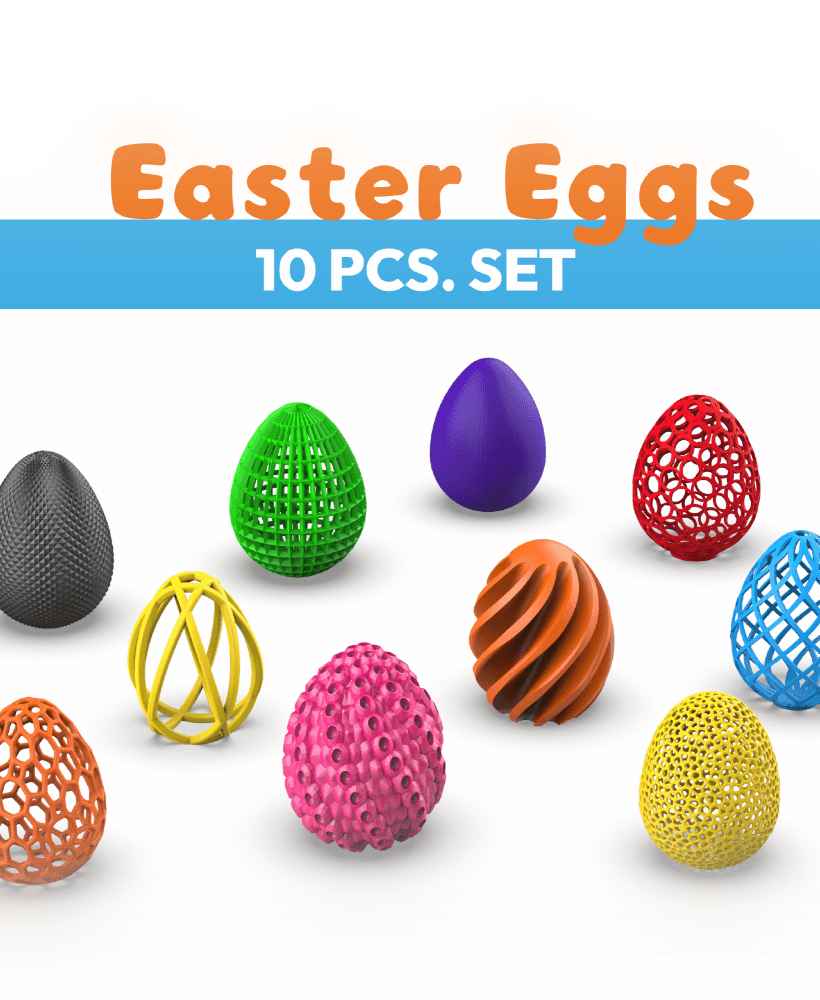
Easter Eggs 10 pcs. Set, Easter Egg Gift, 3D Printing for Decoration, 3D Dragon Eggs, 3D Home Decor
