
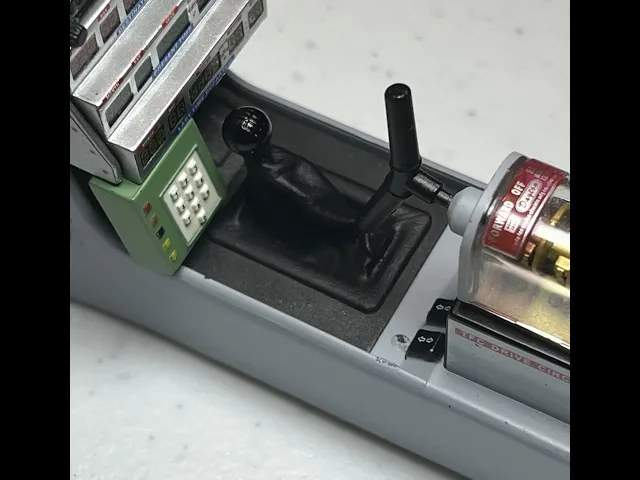


1:8 DeLorean Shifter
Tutorial Video available on the DeLorean Corner youtube page.
This is a direct replacement to the Eaglemoss Fanhome 1:8 scale Time Machine DeLorean shifter. Developed from a 3D scan of an original DeLorean shifter, positioned into 1st gear (DeLorean shifters have play side to side so it has an appearance of 3rd gear position). The scanned model was then scaled 1:8 and the footprint modified to fit the opening in the center console. Care was given to keep the opening overlap to a minimum for those that have added two center console screws just behind the shifter.
This installation reuses the two BP screws from the stock shifter, however you will need an additional BP screw to attach the shifter to the provided baseplate.
Items needed for this model:
3 BP screws Fine detail primer Black paint and finish to achieve a satin shift boot and a semigloss shift knob. Adhesive to bond the shift knob into the shift boot.
Painting and assembling (recommend using an airbrush to keep coats thin to preserve detail)
Prep and Painting:
Remove the shift knob from the baseplate and test fit the knob into the shift boot. The connection is keyed to ensure it is installed in the correct orientation. Notice there is some play in the connection, this is to allow for paint and finish buildup, so once painted and coated this connection should be more snug. Remove the shift boot from the baseplate by using a small flat head screw driver to pop it loose. Remove the 4 sprue stub remnants. There might be quite a bit of wax buildup between where the shifter and baseplate met, this will not effect installation if you leave it, however feel free to scrape it off. Also inspect the hole in the bottom of the shifter for wax buildup. This can be done by gently running a 1.5mm or 1/16" drill bit into the hole to remove any wax. Wash the parts in warm water with dish soap and a soft brush to remove the wax coating to help with paint adhesion. (Note that after priming will be an opportunity for you to inspect for tiny raised spots of remnant wax. If you find buildup they can be easily corrected by gently removing with your fingernail.) Install a BP screw into the hole at the bottom of the shift boot. It is best to do this step now to cut the threads into the hole rather than after your part is finished to avoid risking damage to the finish from handling. And this screw will be a good grab point for an alligator clip for priming and painting. Prime 2 coats of Tamiya Fine Surface Primer (allow at least 8 hours between coats or you may get a rough finish, dry times vary). Paint the shift boot satin black. (Recommend Tamiya XF-1 Flat black. First brush the paint into the deep pockets where it would be difficult to airbrush, afterwards airbrush the model. Then coat with a satin finish, recommend Vallejo satin varnish.) Paint the shift knob semi-gloss black. (Recommend Tamiya X-18 Seme gloss black. This part should not require an additional finish coat.) Assembling:
Fit check the shift knob into the shift boot. Remember the connection is keyed so rotate until it falls into place. The parts should fit snug. If too tight, remove some of the paint and finish buildup from the shift knob shaft or from inside the hole in the shift boot using a small drill bit (1.2mm) until the parts fit. If too loose, the bottom of the shift ball was modeled flat, so ensure the rotation is correct to get the shift pattern markings exactly straight and press the ball to the shift boot to seat flat when bonding. Use any super glue or model glue to bond the shift knob to the shift boot. Install the baseplate to the center console using two BP screws. Install the shifter to the baseplate using a BP screw. Only a snug fit is required so do not tighten the screw or there may be risk of damaging the part or stripping threads. Now you are ready to see if these bast'rds can do 90!

1:8 DeLorean Side Grills

1:8 DeLorean Door Locks and Window Guides

1:8 BTTF DeLorean Dashboard Set

1:8 BTTF DeLorean TFC

1:8 DeLorean Dayton Switch

1:8 Delorean Spare Wheel - Complete

1:8 DeLorean pontoon clips / terminal / split loom

1:8 BTTF DeLorean Golden Relays

1:8 BTTF DeLorean Radio Heatsink

1:8 BTTF DeLorean interior bulkhead set

1:8 BTTF DeLorean Zero Cans Pontoon
1:8 BTTF DeLorean Dashboard Wires Terminal

1:8 BTTF DeLorean Flux Capacitor WITH gasket
1:8 BTTF DeLorean Blue capacitors

1:8 BTTF DeLorean Flux Capacitor withOUT gasket
1:8 BTTF DeLorean Front Flux boxes withOUT screws

1:8 BTTF DeLorean Tow Anchors

1:8 BTTF DeLorean Flux Pipes Set

1:8 BTTF DeLorean Front Flux Boxes WITH Screws
