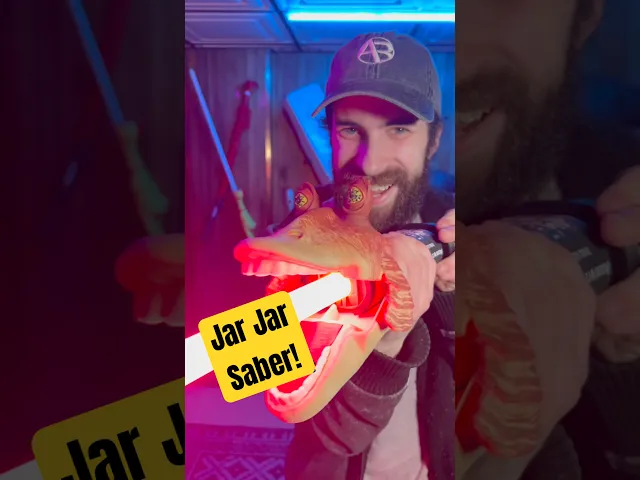
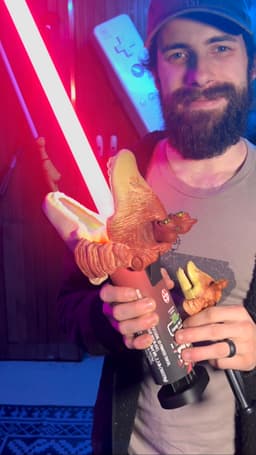


Jar Jar Binks Candy Tongue Lightsaber
Shopping List: Main Materials Various acrylic paints Superglue
Printing Instructions: Note: I have updated my design to include self-tapping threads for the blade set screw. This isn't as strong as an actual embedded nut like my original design, but this version is so much easier to print. As long as you're not over-tightening the screw, you should be fine. But if enough people want the original version with instructions on how to embed the nut within the print, I'll update it here.
For slicer settings, I'd recommend about 4-5 walls and 15% infill (he needs to be strong). Layer height is up to you, but probably don't go above .2 mm. I think most of the files are already properly oriented, except for maybe the head pieces. Just make sure they are pointing upward for the best print quality. For supports, I recommend auto settings for the head, but manually paint for the handle. Only reason for this is that there are small areas for hardware that can't easily be cleaned out after printing. Just make sure you support the underside of the main handle, the interior of the screw threads in the pusher, and maybe the button hole. When you print the main handle, I recommend splitting it in half just below the button hole. This isn't completely necessary, but it does make it MUCH easier to reach areas for assembly later.
Optional: If you have a multicolor printer and don't want to paint as much later, you'll need to manually set/paint the filament colors in your slicer. Just look at photos for reference. If I get enough people requesting it, I might consider splitting each color of the design into separate models to make it easier to multicolor print.
Assembly: After removing all supports, I recommend starting with painting the head- just to give it plenty of time to dry before final assembly. If you printed this with a multicolor printer, then your painting is fairly simple- just dry brushing a layer of dark red over the top area of his head, essentially just hitting the high spots of his wrinkles with your brush. If you wan't a little more detail, you can lightly add some red around his lips and weather him a little with a watered down brown/black paint. Look at photos of an original Jar Jar candy for reference. While that dries, lets move to the main handle. You'll want to first insert the little button piece so that it sticks through the hole on the front. Add a tiny dab of super glue to the front face of that button and snap the button cover onto it to lock the whole button assembly in place. Now, if you split the handle in half before printing, now would be the time to glue those halves back together. Once that is secured, look at your lower pusher piece and examine the inner hole. There should be a thin channel cut out on one side. Match this channel up with the matching channel seen in the hole within the main handle and glue these parts together. If these two channels don't line up, then your saber core won't be able to slide in. Now get out the screw hardware that came with your saber. You'll need the self tapping fastener (should be black I think) and one of the longer set screws with a pointed tip. The hole seen just below the head is for the blade set screw. Tighten this screw until it is just barely far enough away from the internal cutout (so you can insert the blade later). The self tapping fastener should be added to one of the lower screw holes on the back side of the saber core. I think I added mine in one of the holes above the battery. This screw is only for alignment within the hilt, making sure the button is always facing the right way. Once that is in place, you can slide the core into the hilt, making sure that screw aligns with that inner channel. Lock the core in place with the screw cap in the bottom. You can print the label out now (try to print the PDF at full scale to match the proper sizing- but theres a bit of wiggle room in the design if you don't get it exact) and apply it to the hilt... or hold off on that until the end if you're worried about scratching the label during assembly. Cut your dowels into 4 pieces about 2-2.5 inch in length. They will likely need to be sanded down a bit to fit well in their proper holes. Once you feel confident that they will fit, drop a small dab of super glue into the 4 mounting holes at the top of the hilt, then do the same for the respective holes on the head pieces. Now insert the dowels and add the head pieces to the hilt- the top piece (with eyes) goes on the same side of the hilt with the logo. If the dowels don't fit, now is the time to panic and wish you had sanded them more. Otherwise, let that sit for a while so the glue can dry. The hilt is now complete. Insert the blade into Jar Jar's throat and tighten the set screw just enough to secure the blade.
Sound Files: If you've never loaded a custom sound font onto a Xenopixel core before, I'd highly recommend watching some tutorial videos on it. It's worth knowing how things work and how not to ruin your core. The current version of the sound files, similar to my chicken saber, is a little clunky. Basically, I couldn't find an easy way to implement a custom preon that pairs with a particular ignition effect, so I modified the main Xenopixel settings file to include my custom preon effects. (There's a much easier way to do this with Proffie boards, but they're more expensive and harder to work with.) So, the easiest way to make this all work reliably is for me to provide the full contents of my SD card. Just replace all of the files and folders on your card with the ones in the "Full Install" folder and you should be good. Although, I do recommend storing your original files in a safe place though, just in case. (For those that care about the technical details, my settings folder has a custom "saber (7)" file and tweaked config options.) Alternatively, I've provided the "Font Only" file, which works without extra hacks. Only drawback is that the ignition doesn't look quite as cool. To make up for this, theres a wide selection of random ignition sounds in this version. This is the only font version that you can safely use alongside other fonts without risking anything sounding funny. If you go this route, just rename the "Font Only" file to "1" or whatever number that fits in your collection.
Operation: Aside from simply pressing the red logo to operate, you should actually read your Xenopixel manual. This isn't really my product, so you should go to them for learning how to use it. I absolutely recommend using the Xenopixel app though- makes things a lot easier.
Jar Jar Binks Candy Tongue Lightsaber

Jar Jar Binks Display Tongue (Replacement Monster Mouth Candy Tongue)

Ring Pop Key Rings

Pumpkin Krabs

Rubber Chicken Lightsaber
![Coaster Waffle [FREE] 3d model](/_next/image?url=https%3A%2F%2Fstorage.googleapis.com%2Fproduction-thangs-public%2Fuploads%2Fenhanced_images%2Fv1%2F2bf05f52-ee46-492f-a9e3-b92ffcb5ef9e%2FIMG_5881.heic&w=3840&q=75)
Coaster Waffle [FREE]

Coaster Waffles with Storage Toaster

Wacky Waving Inflatable Lightsaber

Life Size Minecraft Furnace

Robot Mr. Krabs (Imitation Krabs)

Giant PEZ Dispenser

Giant Wii Remote (Functional)

Giant Furby Robot (Coco the Furby Dog)

Human Elf on the Shelf

Wearable Furby Mask

Giant Croc Hat

Jar Jar Binks

Jar Jar Binks | The Original Pop-Culture Buddha

STAR WARS Jar Jar Binks Multicolor Flexi Print-In-Place

Cursed Prints by CaptainSubjunctive