.png&w=3840&q=85)
.png&w=256&q=75)
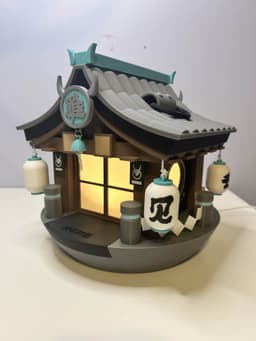


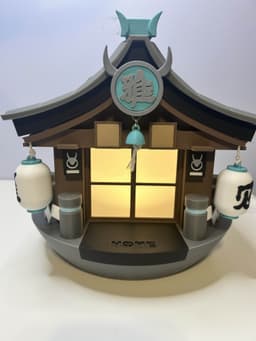

Miyabi's W-Engine (Hailstorm Shrine) Lamp
Miyabi's W-Engine (Hailstorm Shrine) Lamp This model set can be printed completely with a single color printer! No need for a multi-color printer
There are some parts I have made available for those with a multi-color printer. The file names for those will start with "multi". If you are not using a multi-color printer, you may ignore those
This model may go through improvements and updates! Please let me know through IG or Tiktok (@Pneuma3D) if you have any feedback to share!
This print will also require additional parts to purchase/download:
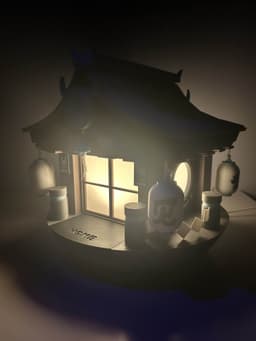
- Bambu Lab LED light kit Amazon Link
- Any white string that can fit through a 2 mm hole, this is one example
- You will need to download and print this base model (0.2mm layer, 6 walls, 25% infill, Base Only) for the LED light to stay on. This W-Engine model is made for this part to fit
- If you want to use a different LED light, just make sure it fits into this model ^^ and it should work out just as well
- Adhesives like super glue may be necessary to keep together.
Filament The colors you will need for this print are: White, Black, Dark Gray, Light Gray, Brown, Teal, Light Brown, Light Blue (Optional: Clear/Transparent for the Windows/Light Diffuser). As long as you have those colors, you can use any brand but if you want to use the filament I used in my video, here are the links:
- White Filament
- Black Filament
- Dark Gray Filament
- Light Gray Filament
- Brown Filament
- Teal Filament
- Light Brown Filament
- Light Blue Filament
Assembly Video There is an assembly video attached that will show you how to assemble everything once printed. To repeat, some parts may need adhesives/super glue to stay on but also be sure to watch the whole video through before gluing anything!
3mf Files I would generally recommend using these 3mf files if you are able as all the pieces are organized in a coherent way without you having to figure out all the file names of the stls:
- MW_Organized_By_Color.3mf
- MW_Organized_By_Part.3mf
- MW_Full_3mf.3mf
STL Files To keep it simple, you need to print every single stl files besides the ones labeled with "multi" or "v2" in the beginning of the file name. As mentioned before, the multi files are for those that want to print certain parts in multicolor but v2 are versions that may or may not be easier to work with when printed on a single color printer. If you are interested in what these options are, here are the details on the v2 versions and the differences from the main versions:
-
There are three different lantern files (excluding the multi-color version)
-
MW_Lantern_NoKanji.stl is the lantern model with absolutely nothing on it. If you print this one, you will need to print all the MW_Lantern_Kanji stls as well (Labeled 1-4) and then use a heat gun to bend the characters into shape to glue onto the lanterns. This is the one shown in the assembly video
-
v2_MW_Lantern_1.stl, v2_MW_Lantern_2.stl, v2_MW_Lantern_3.stl, v2_MW_Lantern_4.stl are the lantern models that have the kanji embedded on the models. For this model, it recommended to use any type of paint or acrylic marker to color in the kanji characters on the lanterns. This option was added in case this was an easier option. You don't have to print the MW_Lantern_Kanji (1-4) files for this one
-
v2_MW_SplitLantern_Bottom and v2_MW_SplitLantern_Top are the lantern models that are split in half and connect together without using glue. This option is not recommended at all but it is provided for those that want to put something (there are magnet activated lights on Bambu that can fit inside) inside the lantern to light it up. (you will need to print all the MW_Lantern_Kanji stls as well (Labeled 1-4) and then use a heat gun to bend the characters into shape to glue onto the lanterns.)
-
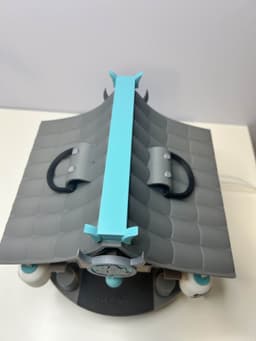
There are also three different middle roof versions, MW_Roof_Middle.stl v2_MW_Roof_Middle.stl and v3_MW_Roof_Middle.stl. This is the black part of the roof that sits on top of the "wood" part of the roof. This will make more sense once you see the assembly video but if you need a little more clearance in between the two roof pieces where the string will rest, v3_MW_Roof_Middle.stl will have more space between the two roof layers (This is hard to explain in text and will make more sense after watching the assembly video) v3_MW_Roof_Middle.stl. has even more space if needed
This work by Pneuma3D is licensed under CC BY-NC-SA 4.0

Miyabi's W-Engine (Hailstorm Shrine) Lamp
.png&w=3840&q=75)
Ye ShunBall - Zenless Zone Zero Fanmade
.png&w=3840&q=75)
Angels of Delusion Clicker Pendant
.png&w=3840&q=75)
Real Miyaball Ornament - Zenless Zone Zero Fanmade
.png&w=3840&q=75)
Ju Fufu Ball Ornament - Zenless Zone Zero Fanmade
.png&w=3840&q=75)
Miyaball Ornament - Zenless Zone Zero Fanmade
.png&w=3840&q=75)
Gingerboo Ornaments - Zenless Zone Zero Fanmade
.png&w=3840&q=75)
Miyabiboo Ear Chopsticks + Stand (Version 1)
.png&w=3840&q=75)
Overtimeboo Figurine
.png&w=3840&q=75)
Robin (Bangboo) - Fanmade
.png&w=3840&q=75)
Boopon Mechanical Clicky Fidget Toy - Zenless Zone Zero Fanmade
.png&w=3840&q=75)
Miyabiboo Infinite Ears
.png&w=3840&q=75)
Officer Cui - Fanmade
.png&w=3840&q=75)
Soukakuboo - Fanmade
.png&w=3840&q=75)
Harumasaboo - Fanmade
.png&w=3840&q=75)
Red Moccus - Fanmade
.png&w=3840&q=75)
Butlerboo - Fanmade
.png&w=3840&q=75)
Bangvolver - Fanmade
.png&w=3840&q=75)
Baddieboo - Fanmade
.png&w=3840&q=75)
Sharkboo - Fanmade
.png&w=3840&q=75)
The 3MF files don't seem to be included in the project zip file is there an alternative download? it'd certainly help to organize them by color for expediency :D
I just checked the download and they should be in there! The files names are
You are so right I am totally blind!! Thank you for responding :D