


1:8 DeLorean Side Grills
0 downloads · 1 year ago · **Tutorial video available on the YouTube channel**
This is a direct replacement to the Eaglemoss /
Order your 3D print
Tutorial video available on the YouTube channel
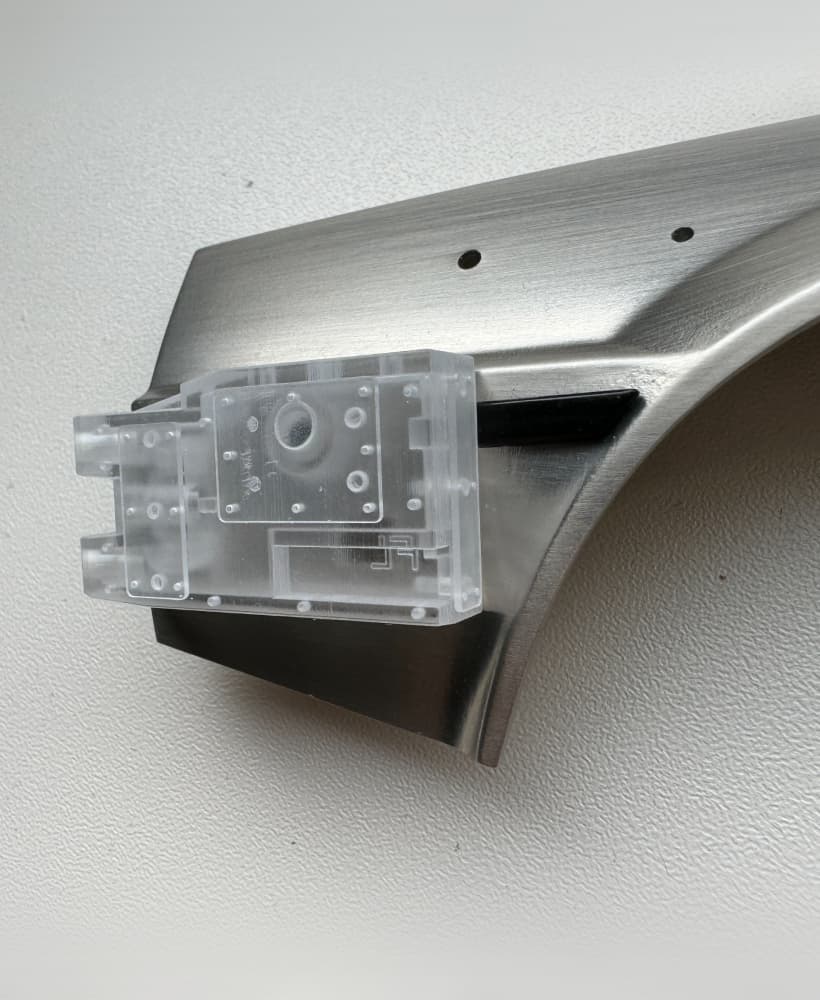
This is a direct replacement to the Eaglemoss / Fanhome 1:8 scale Time Machine DeLorean side air induction grills. Developed from a 3D scan of an original DeLorean side grill, the model was then scaled 1:8 and modified slightly in order to fit the car. These grills have the correct radius and slope to the fins giving the part more depth, and also has the hole for air intake. This installation reuses two of the four AP screws from the stock grill installations.
Items needed for this model:
- 2 AP screws
- A small hobby file for removing a small amount of flashing from around the existing screw holes on the car to allow the new grills to sit flat to the model.
- Fine detail primer
- Black paint and finish to achieve a satin black finish on the grills.
- Scotch tape and flat black paint to cover up the existing screw holes not being used. Painting and assembling (recommend using an airbrush to keep coats thin to preserve detail):
Prep and Painting -
- Remove the grills from the sprues and remove the 4 sprue stub remnants so the parts can sit flat on the model.
- IMPORTANT Inspect the screw holes in the grills for wax buildup. Not doing this can lead to damage when installing a screw as did happen once to me. This inspection can be done by gently running a 1.5mm drill bit into the hole 3.5mm to remove any wax. If you don't have a 1.5mm drill bit, place one of the sprues into the hole and verify you can insert it 3.5mm. The issue that can arise is if there is wax buildup and the screw can not install into the hole, the compressing wax will force a bulge to form on the visible side of the part as happened once to me. Or another issue is this could also strip the threads. Once you've inspected the hole is clear to 3.5mm, install an AP screw to cut the threads into the part.
- Wash the parts in warm water with dish soap and a soft brush to remove the wax coating to help with paint adhesion. (Note that after priming will be an opportunity for you to inspect for tiny raised spots of remnant wax. If you find buildup they can be easily corrected by gently removing with your fingernail.)
- Install AP screws into the parts for a good grab point for an alligator clip for priming and painting.
- Prime 2 coats of Tamiya Fine Surface Primer (allow at least 8 hours between coats or you may get a rough finish, dry times vary).
- Paint the parts satin black. (Recommend Tamiya XF-1 Flat black. Then coat with a satin finish, recommend Vallejo satin varnish.)
- Paint a 2 inch (50 mm) long piece of scotch tape flat black.
Assembling -
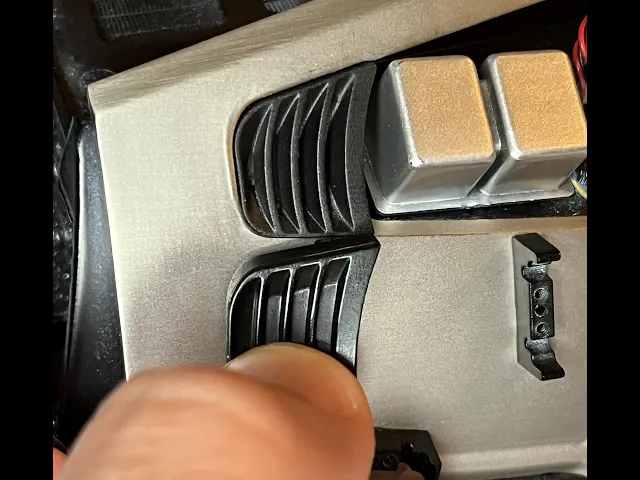
- Using the small hobby file, remove the flashing from around the four existing screw holes on the metal panels.
- Once smooth, cut the painted black tape in half and apply the tape to the metal surface in the area that will be visible through the air intake hole in the parts. Trim the tape where appropriate.
- Place the grill in place and install using the AP screw. Only tighten until just barely snug, no need to tighten further to risk damage to the part. Now the engine can get the air it needs to hit 88mph! At least in our imagination.
1:8 DeLorean Side Grills
1 year ago in and
Order your 3D print
Shipto you
.png&w=3840&q=75)
COMBO PACK 1:8 Scale DeLorean Side Grills with Door Locks and Window Guides
Shipto you

1:8 BTTF DeLorean Front Grille
Shipto you

1:8 DeLorean dashboard speaker hole template
Shipto you

1:8 RP1 Ecto-88 DeLorean front grille
Shipto you

1:8 DeLorean Shifter
Shipto you

1:8 BTTF DeLorean TFC
Shipto you

1:8 DeLorean Door Locks and Window Guides
Shipto you

1:8 BTTF DeLorean Dashboard Set
Shipto you

1:8 DeLorean Dayton Switch
Shipto you

1:8 BTTF DeLorean Golden Relays
Shipto you

1:8 Delorean Spare Wheel - Complete
Shipto you

1:8 DeLorean pontoon clips / terminal / split loom
Shipto you

1:8 BTTF DeLorean Radio Heatsink
Shipto you

1:8 BTTF DeLorean interior bulkhead set
Shipto you

1:8 BTTF DeLorean Zero Cans Pontoon
Shipto you
1:8 BTTF DeLorean Dashboard Wires Terminal
Shipto you

1:8 BTTF DeLorean Flux Capacitor WITH gasket
Shipto you
1:8 BTTF DeLorean Blue capacitors
Shipto you

1:8 BTTF DeLorean Flux Capacitor withOUT gasket
Shipto you