


Rotary Tool Permanent Table Mount - Bolt-in & Screw-in Models
The rotary tool permanent table mount comes in two designs: bolt-in and screw-in. A smooth and cleated baseplate are included if you need to add more stability, though with thicker tabletops it isn’t always necessary, it depends on the material you are mounting to. A vibration damper design is also included.
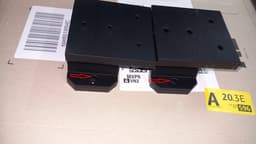
Rotary Tool Mount – I spray the inside of the sockets for the nuts with superglue activator then add a drop of medium or high viscosity cyanoacrylate (thick super glue), then I place the nuts and let it set - reference the photo where the red arrows are. This way, the nuts stay in a fixed position. This is optional but it makes using the mount much easier.
Baseplates - I use the smooth baseplates on thicker tabletops made with harder materials and the cleated baseplates on thin or soft wood tabletops. I recommend using vinyl lock nuts or lock washers. You can use plain nuts and bolts but they may back out with prolonged use. The bolts can also dig into the material so a washer is a good idea – reference the photo where the red arrow is.
Vibration Damper - A vibration damper insert model is also included. I print this piece in TPU 95A and place it between the rotary mount and tabletop or between the smooth baseplate and the underside of the tabletop. You can have one on the top and bottom if you like, it depends on how you choose to mount everything. I designed the vibration damper for when I’m sanding edges on harder materials that create a lot of vibrations. You can also use 3M two-sided tape for this if you don’t have any TPU – a roll of two-sided tape costs a lot less than a roll of TPU 95A, just tighten it down really good.
Do not use the cleated baseplate with the vibration damper, it won’t work as good. The surfaces don’t mate up properly and it will cause vibrations.
You can also print the vibration damper in any filament and use it as a template for marking the holes before drilling into the tabletop for a clean installation.
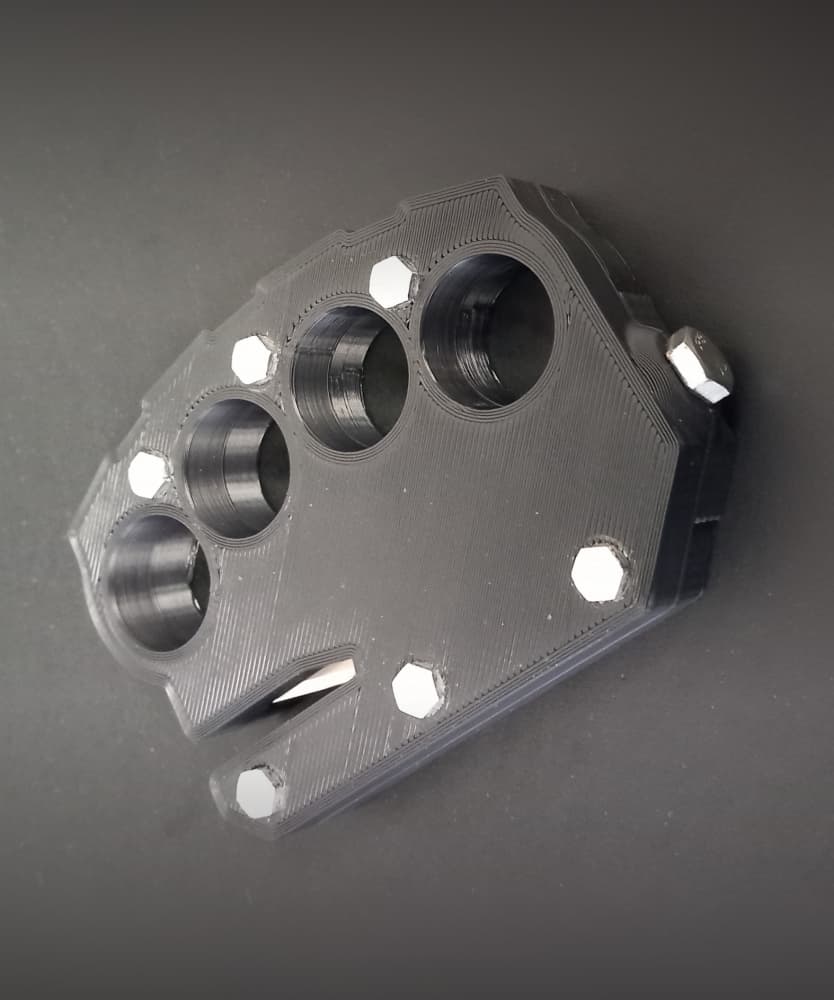
Reference the photo for dimensions and compare it to the dimensions of your rotary tool, nuts, bolts, washers, screws etc. You can remix to suit your needs. If you want to increase the hole sizes etc. and want to make the wall surfaces thicker, extrude the exterior surfaces, this way your rotary tool will still fit correctly in the socket.
Prints in the upright position without any supports. I print with 4 walls and 50% triangular infill at 10% moisture. After printing I use a small plastic brush to remove any small stringing. Don’t go cheap on the walls or infill, as this will be exposed to vibrations. A rigid filament like PLA+, CF-PLA, PA-CF etc. works best.
Installation note – mount the bolts into the rotary tool mount before you bolt it or screw it to the tabletop. To remove the rotary tool, just loosen the bolts a bit and it slides out.
Dry your filament, eat your vegetables, don't do drugs.
About me I’m an old-school veteran chef and I’m battling kidney disease. With it has come a lot of life changes, some great and some small. After a lifetime of 80 & 90-hour work weeks, the idea of not working is an absolutely alien concept, so I tinker, create and design to keep myself busy. I love to share my designs with Fellow Creators.
Rotary Tool Permanent Table Mount - Bolt-in & Screw-in Models

Self-defense Knife

Alfa Romeo Wheel Coin Box
Emergency Seatbelt Cutter / Glass Breaker - Car Escape Device

Thin Wire Stripper

Avocado Pit Germinating basket

Bomber Coaster Kit - US Army - w DXF files for laser cutting & engraving

50mm Keychain Kit - Smiley Face, Shock Hazard, Exclamation Point & Blank

Lil' Lupo Rotary Tool Drill Press Accessory - Leather Sanding Rig

Lil' Lupo Rotary Tool Drill Press Accessory - LED Kit

Lil' Lupo Rotary Tool Drill Press Accessory - Material Clamp Kit
Lil' Lupo Rotary Tool Drill Press Accessory - Vacuum Port Kit

Lil' Lupo Rotary Tool Drill Press Accessory - Safety Shield

Lil' Lupo Rotary Tool Drill Press Accessory - Precision Sanding Rig

Leather & PLA High-Vis Shock Bracelet + DXF Laser File

Lil' Lupo Rotary Tool Drill Press Accessory - Grab & Carry Handle
Lil' Lupo Rotary Tool Drill Press w Modular Accessories

Mini Caliper Case

US Half Dollar Keychain - TPU

Stanley Utility Knife Case + Razor Storage
