

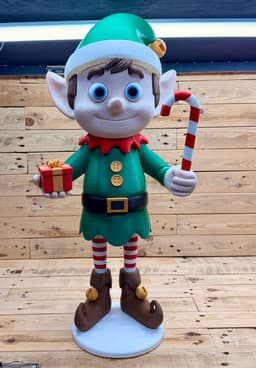


XL Elf
XL Elf, for larger build plates t's here, The XL Elf. For build plates Above 320x320x320 for smaller build plates, Please see other post for the Not So.. XL Elf. So ive done a couple of bits differently this time round. Firstly ive included one set of connectors so as to not over complicate it with different sizes. the connectors should be fine for the size Elf you've chosen. The connectors for each part are on the build plates with each part and named. However they are interchangeable so there is only 4 sizes of connectors, plus the two connectors for the legs. These connect from boots all the way up to the body. The candy cane has 3 square connectors, one long and 3 short. The stem of the candy all the parts are equal so its doesn't matter which way round the go. Obviously flat side to the back. At the curve it's fairly straight forward how it goes together. But you will need to glue. The present box. This it the same present box i made last year with a small modification to fit on the right hand. again its fairly straight forward how this goes together. But in case you're struggling. the base ribbon goes of the base and clips in. the top ribbon goes over the top and clips in. the very small ribbon connector goes through the top on the inside with the bow clipping onto it from the outside. Press the connector firmly from the inside and press the bow firmly in the centre from the outside and the will clip together. If your struggling apply the tiniest bit of heat to soften the plastic and try again. again with the connector on the hand it will clip in place. now there is a small amount of flex in the box base so you will need to press firmly on the inside centre, either side of the hole. you'll find once you've done it once it loosens a little and is easier. The Elf itself. if you put together any of my other XL models you will be familiar. You will need glue. They to for the most part stay together without glue if you want to test build first. Be organised with your pieces. But as said above the connectors are all one of 4 so in reality doesn't matter what colour they are or where they go as long as they are the right size. In terms of supports. ive set the top z to 0.275 and found really easy to remove. Very little of the outer body requires supports. However different from previous models i have included cavities within the larger pieces to save filament. and have roughly save 1kg in total across the colours. you will need to break the supports up in the cavity and made access as big as i can. I will have a short build release video over on tiktok. filaments used. Bambu, beige for the skin, mistletoe green. red, white, black and gold basic. Ive include a screen shot of the sliced file with estimated filament amounts used. Otherwise enjoy the build..
EDIT, corrected Bottom hat' part. an incorrect version was uploaded meaning you could see the cavity once built.
XL Elf

Not So XL Reaper

XL Reaper

Melted Round Pumpkin

Melted Long Pumpkin

Kevin the Snail

Double indent Pain sensory fidget

Witches Hand with Cauldron

Not So XL Scarecrow (for smaller build plates below 300x300x300)

XL Scarecrow (for larger build plates above 320x320x320)

Monsterpus

Zebra Pot

Contemporary Bird House

Wenwan, Fidget Walnuts

Heart Payment Wand End

Zombie Dragon Bust

Triple Clicker pain sensory fidget

Happy Planter

World Cup Trophy Replica

Plain Goose update pack

cant wait to see this printed.