


Hextraction Floppy Disk Tile
Following up the Blue Tile of Death, here is the Floppy Disk tile! The trap is the trigger zone, so you get to "save" a trapped ball. You can use the ball at any point in the game during your turn as an extra roll. There is no enforced limit on how many extra rolls you can accumulate, but feel free to set a house rule if you find it needed.
Rules Card Text Trigger: Remove the ball. You may use it in any turn as an extra roll.
Printing & Assembly Instructions - Please Read Before Printing Like most of my tiles, I've designed this such that you can print without using an AMS or other color swap tools, and instead some straightforward gluing gets the job done.
Printing the tile:
- Print the floppy_disk_base, floppy_disk_upper_segment, floppy_disk_upper_main.
- Print either the floppy_disk_text_area OR floppy_disk_text_area_no_text, depending on if you want the embossed "Hexcel V8.4.24" text or not. In the model images, you can see how it looks with the embossed text. However, I prefer without the text. The version number is a reference to my own work.. let me know if you figure it out!
- Glue all pieces together. You may get away with friction fit with the upper main piece and the tile body, but can glue as needed to be secure.
I have also provided a 3mf in case you wish do a multicolor print or anything else.
Printing the card: You have more options here. I have provided a single STL of the entire card with and without the text if you just want it that way and wish to change filaments at some given layer height, and again if you want it with or without the text. Otherwise:
- Drag floppy_disk_card_base and floppy_disk_card_details into your slicer at the same time, this way they are aligned and you can assign filament and swap as needed.
- Print floppy_disk_upper_main and floppy_disk_card_text_area_no_text. I have elected not to provide a "with text" version as the print quality was not up to my standards; I had debossed the text to comply to card standards.
- Glue the text area piece and the upper segment piece to the card once everything is all done, they should nicely fit into place.


Hextraction Floppy Disk Tile

Floppy Eyes Monster Stamp Tile Set, 5 Sizes, Clay & Cookie Mold, Fun Cartoon Character Motif, Fondant & Soft Material Stamps PRODUCT_3120

Retro Mouse-Shaped Catch-All Tray — 3D Printed Desk Organizer

Pluto STL File – Cute 3D Printable Disney Dog – Chibi Cartoon Puppy Figure for Collectors – Kawaii A

Pluto STL – Cute Chibi Dog Holding Bone – Disney-Inspired 3D Print Model (Limited Time)

GEN2 Tilt Drawer Pro - 115

Tiles from Portugal (Wall, Desk or Stackable Lamp)

ModBots – Series 1 Starter Pack

Algarve Tray – Portuguese-Style Decorative Serving Tray

Plastic3D Articulated Frog

Lisbon Holder — Geometric Desk Holder

Who Framed Roger Rabbit Action Figure
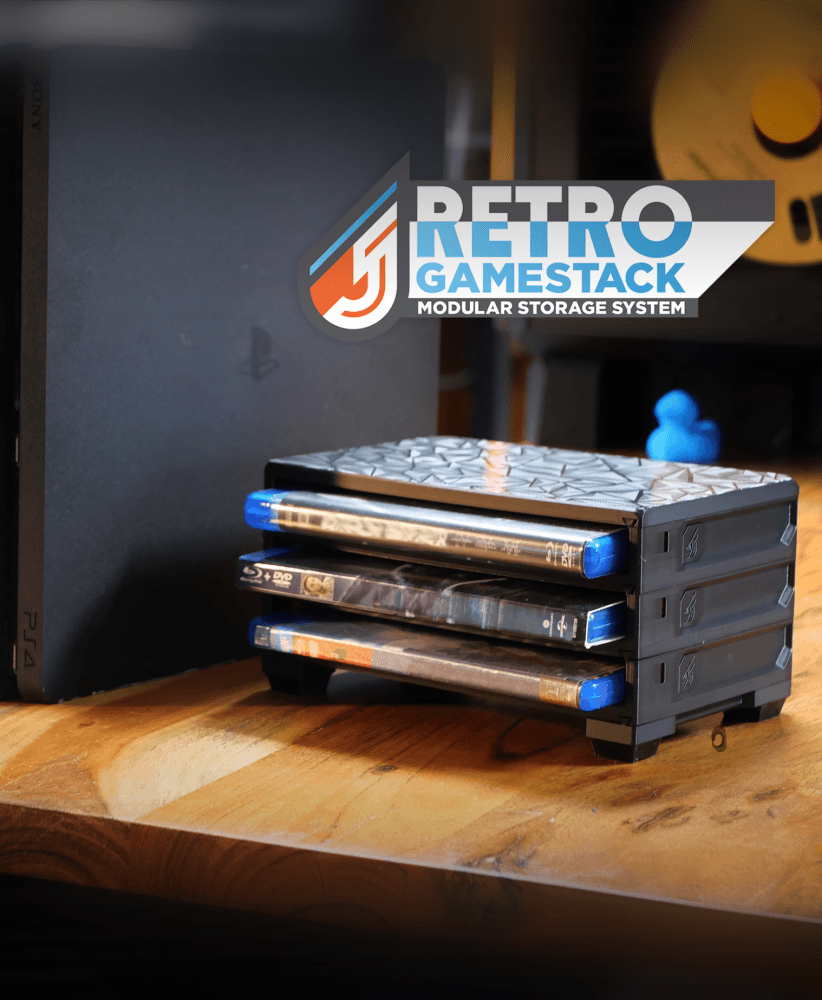
RETRO GameStack - PS5/PS4/PS3/Blu-ray

Tile Lamp - Wall, Desk, or Stackable Lamp

Cinnamoroll Cloud Tray – Adorable Dish for Cute Desk & Home Decor

Tiles from India (Wall, Desk or Stackable Lamp)

Gridfinity Tabletop RPG Grass Terrain Tiles
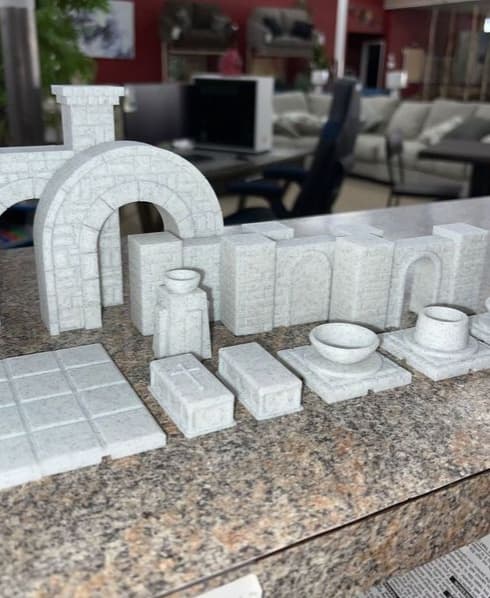
D&D Structures Pack 1 - Print in place

Winter Mosaic Vase – Textured Holiday Decor

Tileflower Vase – Modern Portugal-Inspired Vase with Floral Motif
.png&w=3840&q=75)