Model originally uploaded to Thingiverse at https://www.thingiverse.com/thing:4359734.
I've started making some of the nice HKCams created by another user here https://www.thingiverse.com/thing:3587354. The website for this project is here: https://hochgatterer.me/hkcam/. His software is easy to install on a Raspberry Pi Zero W and works great with HomeKit (Siri).
Unfortunately, I struggled a little with the actual 3D printed case, so here's my attempt to address these issues. Although the design is very similar, my design was built from scratch in Fusion 360. I am tagging the original in the spirit of "remix culture", but this is original work too. I am also respecting the original license.
Here's my list of improvements:-
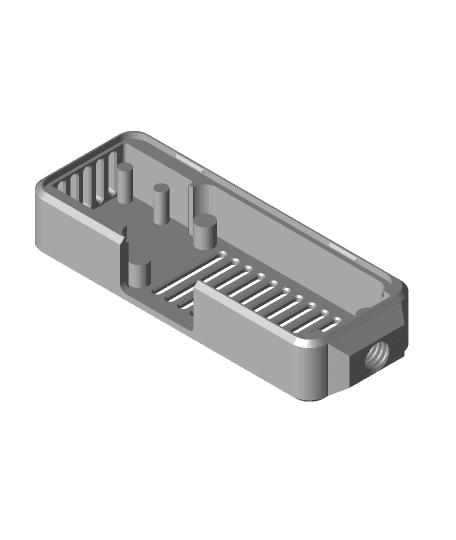
Designed for FDM printing. The original, while gorgeous, includes a number of surfaces that just don't print nicely on a FDM printer. For example, the filleted edges and the hex-nut on the bottom of of the body resulted in very droopy overhangs for me;
-
The 1/4" standard-for-tripods UNC thread is just too small for 3D printed threads. Many of my prints were ruined when the threaded bolt of the tripod broke off inside the body. Impossible to get out, so, 2 of the 3 parts would need to be re-printed each time. In this design, I opted to use the 50% larger 3/8" UNC thread you find on some tripods. This works really nicely!
-
The tripod is just that, a TRI-pod. With 3 legs it will never wobble if one the legs are slightly non-planar with the others. Also, I've made the ends slightly larger, with a slightly larger stance and circular. I stick tiny rubber feet there for an extra firm grip on the surface below.
-
The aperture beside the two Micro USB ports has been re-positioned for the new Pi location and slightly enlarged to allow for 90° micro-USB angle connectors, this allows my power cable to point down instead of straight out the side.
-
The Pi Zero was too low in the body to allow for a typical 5mm heat sink on my Pi's processor. This design lets the Pi sit high enough that a heat sink fits nicely.
-
Speaking of heat, this design has vents on the top of the body too, this should allow a nice updraft from the side vents, across the surface of the PI, then up, passing the camera and out the top.
-
An extra tab to hold the lid on very nicely.
-
Sleeker beveled part where the threaded connection hole is rather than what looks like a hex-nut tacked on (design choice?)
-
Slightly larger tolerances between the Pi and the body.
In addition to a photo of a finished piece in Galaxy Black and black PLA, I've also supplied a number of renders from F360, the cyan ones are rendered with a transparent lid so that the detail is visible, but no, I can't print acrylic with my Prusa =). The Galaxy Black renders look almost identical to the real thing though =) I've also included a couple with a yellow lid for visual comparison to the original project.